5 Simple Steps To Get Your Test Suite Running in Heroku CI
If you’re using Heroku for your production environment — and you’re ready to go all in with DevOps — then using pipelines and Heroku CI may be the way to go.
Join the DZone community and get the full member experience.
Join For FreeSo, I’ve always thought about Heroku as just a place to run my code. They have a CLI. I can connect it to my GitHub repo, push my code to a Heroku remote, and bam…it’s deployed. No fuss. No mess.
But I had always run my test suite…somewhere else: locally, or with CircleCI, or in GitHub Actions. How did I not know that Heroku has CI capabilities? Do you mean I can run my tests there? Where have I been for the last few years?

So that’s why I didn’t know about Heroku CI…
CI is pretty awesome. You can build, test, and integrate new code changes. You get fast feedback on those code changes so that you can identify and fix issues early. Ultimately, you deliver higher-quality software.
By doing it in Heroku, I get my test suite running in an environment much closer to my staging and production deployments. If I piece together a pipeline, I can automate the progression from passing tests to a staging deployment and then promote that staged build to production.
So, how do we get our application test suite up and running in Heroku CI? It will take you 5 steps:
- Write your tests
- Deploy your Heroku app
- Push your code to Heroku
- Create a Heroku Pipeline to use Heroku CI
- Run your tests with Heroku CI
We’ll walk through these steps by testing a simple Python application. If you want to follow along, you can clone my GitHub repo.
Our Python App: Is It Prime?
We’ve built an API in Python that listens for GET requests on a single endpoint:/prime/{number}. It expects a number as a path parameter and then returns true or false based on whether that number is a prime number. Pretty simple.
We have a modularized function in is_prime.py:
def is_prime(num):
    if num <= 1:
        return False
    if num <= 3:
        return True
    if num % 2 == 0 or num % 3 == 0:
        return False
    i = 5
    while i * i <= num:
        if num % i == 0 or num % (i + 2) == 0:
            return False
        i += 6
    return True
Then, our main.py file looks like this:
from fastapi import FastAPI, HTTPException
from is_prime import is_prime

app = FastAPI()

# Route to check if a number is a prime number
@app.get("/prime/{number}")
def check_if_prime(number: int):
    return is_prime(number)
    raise HTTPException(status_code=400, detail="Input invalid")

if __name__ == "__main__":
    import uvicorn
    uvicorn.run(app, host="localhost", port=8000)
That’s all there is to it. We can start our API locally (python main.py) and send some requests to try it out:
~$ curl http://localhost:8000/prime/91
false

~$ curl http://localhost:8000/prime/97
true
That looks pretty good. But we’d feel better with a unit test for the is_prime function. Let’s get to it.
Step #1: Write Your Tests
With pytest added to our Python dependencies, we’ll write a file called test_is_prime.py and put it in a subfolder called tests. We have a set of numbers that we’ll test to make sure our function determines correctly if they are prime or not. Here’s our test file:
from is_prime import is_prime

def test_1_is_not_prime():
    assert not is_prime(1)

def test_2_is_prime():
    assert is_prime(2)

def test_3_is_prime():
    assert is_prime(3)

def test_4_is_not_prime():
    assert not is_prime(4)

def test_5_is_prime():
    assert is_prime(5)

def test_991_is_prime():
    assert is_prime(991)

def test_993_is_not_prime():
    assert not is_prime(993)

def test_7873_is_prime():
    assert is_prime(7873)

def test_7802143_is_not_prime():
    assert not is_prime(7802143)
When we run pytest from the command line, here’s what we see:
~/project$ pytest
=========================== test session starts ===========================
platform linux -- Python 3.8.10, pytest-8.0.2, pluggy-1.4.0
rootdir: /home/michael/project/tests
plugins: anyio-4.3.0
collected 9 items

test_is_prime.py .........                                                                                                                                                                             [100%]

============================ 9 passed in 0.02s ============================
Our tests pass! It looks like is_prime is doing what it’s supposed to.
Step #2: Deploy Your Heroku App
It’s time to wire up Heroku. Assuming you have a Heroku account and you’ve installed the CLI, creating your app is going to go pretty quickly.
Heroku will look in our project root folder for a file called requirements.txt, listing the Python dependencies our project has. This is what the file should look like:
fastapi==0.110.1
pydantic==2.7.0
uvicorn==0.29.0
pytest==8.0.2
Next, Heroku will look for a file called Procfile to determine how to start our Python application. Procfile should look like this:
web: uvicorn main:app --host=0.0.0.0 --port=${PORT}With those files in place, let’s create our app.
~/project$ heroku login

~/project$ heroku apps:create is-it-prime
That's it.
Step #3: Push Your Code to Heroku
Next, we push our project code to the git remote that the Heroku CLI set up when we created our app.
~/project$ git push heroku main
…
remote: -----> Launching...
remote:        Released v3
remote:        https://is-it-prime-2f2e4fe7adc1.herokuapp.com/ deployed to Heroku
So, that’s done. Let’s check our API.
$ curl https://is-it-prime-2f2e4fe7adc1.herokuapp.com/prime/91
false

$ curl https://is-it-prime-2f2e4fe7adc1.herokuapp.com/prime/7873
true

$ curl https://is-it-prime-2f2e4fe7adc1.herokuapp.com/prime/7802143
false
It works!
Step #4: Create a Heroku Pipeline To Use Heroku CI
Now, we want to create a Heroku Pipeline with CI enabled so that we can run our tests.
We create the pipeline (called is-it-prime-pipeline), adding the app we created above to the staging phase of the pipeline.
$ heroku pipelines:create \
  --app=is-it-prime \
  --stage=staging \
  is-it-prime-pipeline

Creating is-it-prime-pipeline pipeline... done
Adding ⬢ is-it-prime to is-it-prime-pipeline pipeline as staging... done
With our pipeline created, we want to connect it to a GitHub repo so that our actions on the repo (such as new pull requests or merges) can trigger events in our pipeline (like automatically running the test suite).
$ heroku pipelines:connect is-it-prime-pipeline -r capnMB/heroku-ci-demo

Linking to repo... done
As you can see, I’m connecting my pipeline to my GitHub repo. When something like a pull request or a merge occurs in my repo, it will trigger the Heroku CI to run the test suite.
Next, we need to configure our test environment in an app.json manifest. Our file contents should look like this:
{
  "environments": {
    "test": {
      "formation": {
        "test": {
          "quantity": 1,
          "size": "standard-1x"
        }
      },
      "scripts": {
        "test": "pytest"
      }
    }
  }
}
This manifest contains the script we would use to run through our test suite. It also specifies the dyno size we (standard-1x) would want to use for our test environment. We commit this file to our repo.
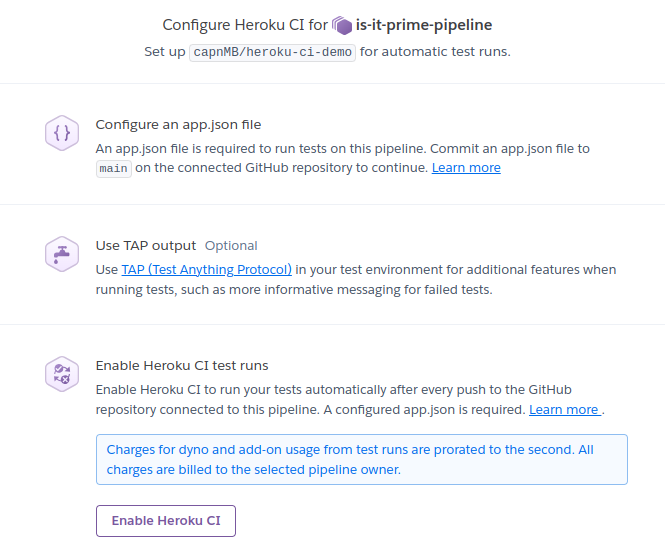
Finally, in the web UI for Heroku, we navigate to the Tests page of our pipeline, and we click the Enable Heroku CI button.
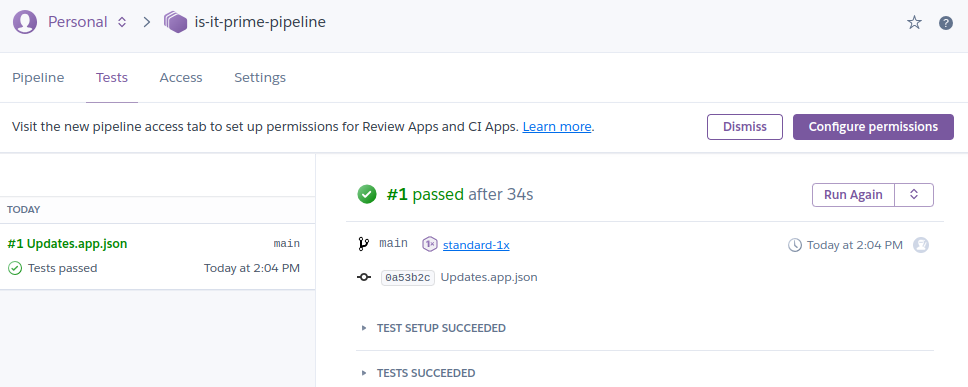
After enabling Heroku CI, here’s what we see:

Step #5: Run Your Tests With Heroku CI
Just to demonstrate it, we can manually trigger a run of our test suite using the CLI:
$ heroku ci:run --pipeline is-it-prime-pipeline
…
-----> Running test command `pytest`...
========================= test session starts ============================
platform linux -- Python 3.12.3, pytest-8.0.2, pluggy-1.4.0
rootdir: /app
plugins: anyio-4.3.0
collected 9 items

tests/test_is_prime.py .........                                         [100%]

============================ 9 passed in 0.03s ============================
How does the test run look in our browser? We navigate to our pipeline and click Tests. There, we see our first test run in the left-side nav.
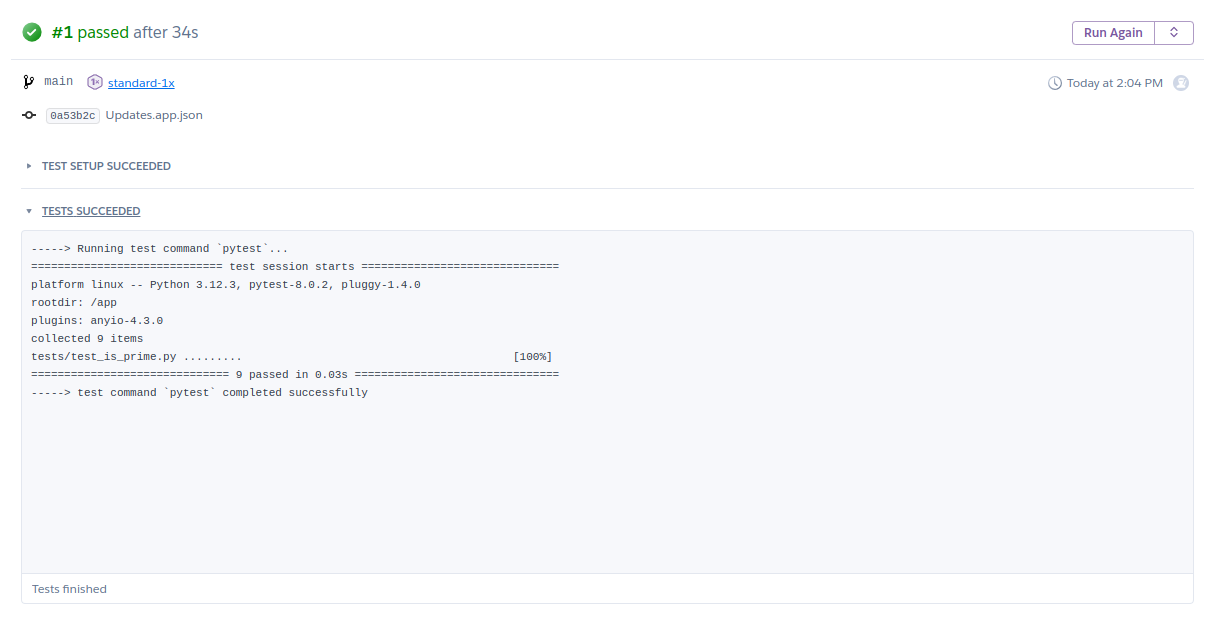
A closer inspection of our tests shows this:
Awesome. Now, let’s push some new code to a branch in our repo and watch the tests run!
We create a new branch (called new-test), adding another test case to test_is_prime.py. As soon as we push our branch to GitHub, here’s what we see:

Heroku CI detects the pushed code and automates a new run of the test suite. Not too long after, we see the successful results:

Heroku CI for the Win
If you’re already using Heroku for your production environment — and you’re ready to go all in with DevOps — then using pipelines and Heroku CI may be the way to go.
Rather than using different tools and platforms for building, testing, reviewing, staging, and releasing to production… I can consolidate all these pieces in a single Heroku Pipeline and get automated testing with every push to my repo.
Opinions expressed by DZone contributors are their own.
Comments