Build an ELT Pipeline From MySQL Database
Easily set up MySQL Change Data Capture using open-source Airbyte and Debezium to construct a near real-time ELT pipeline.
Join the DZone community and get the full member experience.
Join For FreeMySQL is one of the most widely used and most popular databases for web applications. Hence, data engineers often have to create pipelines to replicate data stored in MySQL into data warehouses or data lakes to make it available for analytics.
Airbyte is an open-source data integration platform that allows you to easily build ELT pipelines from MySQL into any of the several supported destinations using log-based Change Data Capture (CDC).
CDC is a sought-after method of ingesting data from databases. Even though there are several ways of implementing CDC to ingest data through log-based MySQL CDC offers essential advantages, which include:
- The ability to replicate deletes from the source to the destination.
- Not overloading the source database like with other methods – which generally involve constantly polling it.
In this tutorial, you’ll learn how to easily create an ELT pipeline to replicate data from a MySQL database using log-based Change Data Capture. I use a local JSON as the destination to illustrate how data looks when replicated through MySQL CDC.
But, before we begin, let’s clarify some key concepts that you should know to understand what happens when you use Airbyte’s MySQL source connector with CDC.
Consuming the MySQL Binary Log With Debezium
MySQL has an internal feature called binary log (binlog), where all the operations committed to a database are recorded – including DDL and changes to the tables’ data.
Even though enabling binary logging in a MySQL server could slightly impact performance, having a binlog is beneficial for mainly two scenarios: recovery and replication. The latter is very relevant in the context of this tutorial because it’s what enables the creation of ELT pipelines from MySQL using CDC.
When talking about MySQL CDC, we refer to the infrastructure that constantly scans the binlog for operations committed to the source database. The “L” part of the ELT is completed when the list of operations in the binlog is replicated to the destination – which can be anything from a database, data warehouse, or data lake.
Airbyte uses Debezium to implement MySQL CDC, encapsulating it to hide the complexity from the user. So, you don’t need to worry about setup or knowing the specifics of the technology.
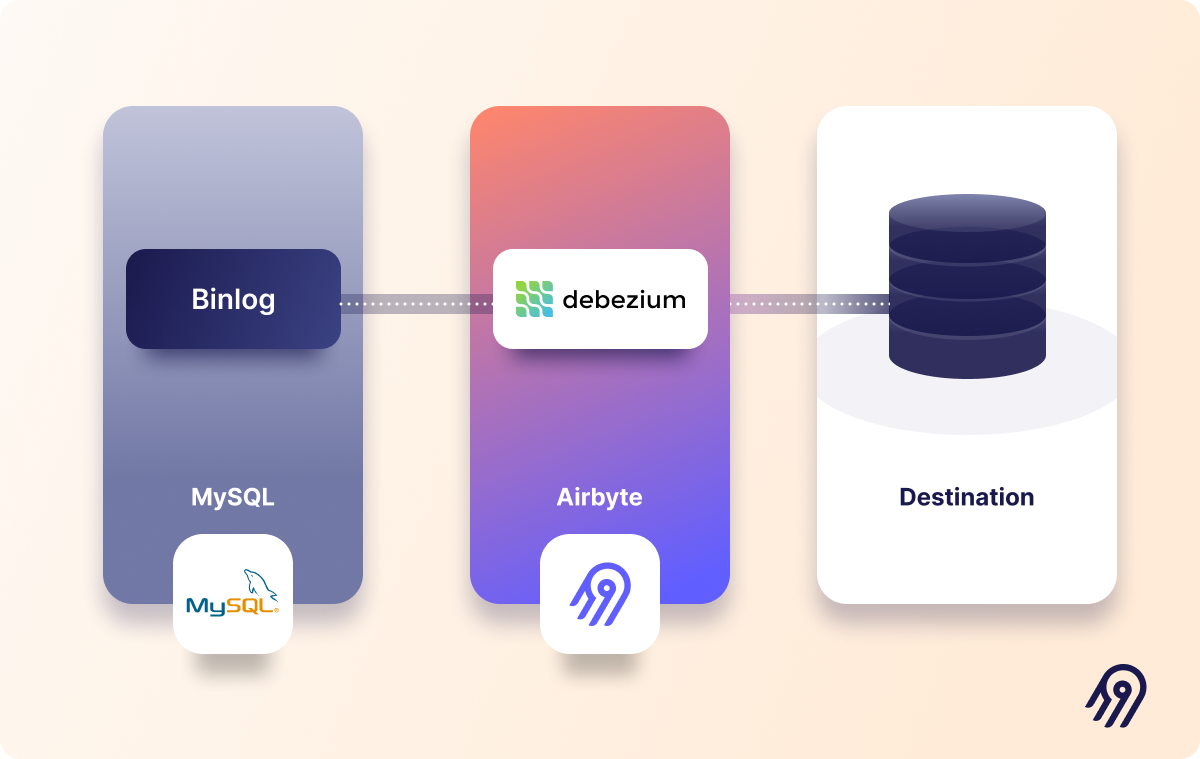
Debezium is an open-source framework for Change Data Capture. It scans the MySQL binlog in near real-time and streams every row-level committed operation – such as insert, update, and delete – maintaining the sequence in which the operations were carried out.
Airbyte uses the Debezium core engine and Debezium MySQL connector, which connect to the database and parse the binlog in JSON format. Then, Airbyte passes the JSON records onto the destination.
Now that you have the necessary context let’s get hands-on!
Prerequisites
- Have Docker and Docker Compose installed.
- Deploying Airbyte.
Versions Used in This Tutorial
- Docker: 4.8.2
- Compose: 1.29.2
- MySQL Docker image tag: 8
- Airbyte: 0.38.1-alpha
Step 1: Start a MySQL Docker Container (Optional)
ℹ️ If you already have an existing database in MySQL, you can skip this step.
Use docker to kick-start a MySQL container. To do that, run the following command in your terminal. In this case, the container will be named airbyte-mysql. You can set a different name and password.

⚠️ Add --platform linux/x86_64 to the command above when running on M1 Apple processor.
Step 2: Configure Your MySQL Database (Optional)
ℹ️ If you already have an existing database in MySQL, you can skip this step. Just make sure to have a user with the necessary permissions.
Now, it's time to configure a MySQL database, user, and necessary privileges. You can use the MySQL command-line client, which will allow you to execute queries from the terminal interactively. To start the MySQL client, you need to SSH into the Docker container you just started in the previous step.

Once in the container, start the client.

Provide the password you set up when launching the container, and you’ll be ready to execute queries. Now, create a database.

Then, create a table and insert a couple of rows into it.

Next, you need to create a dedicated read-only user with access to the recently created table.
Although the database can be accessed with the root user, it is advisable to use a less privileged read-only user to read data. The user will be called airbyte and the password should be updated with a strong password of your choice.

For the CDC replication method, you need to grant SELECT, RELOAD, SHOW DATABASES, REPLICATION SLAVE, and REPLICATION CLIENT permissions to the user.

That’s it! Your database in MySQL is ready to be used.
Step 3: Configure a MySQL Source in Airbyte
To set up a new MySQL Airbyte source, go to Airbyte's UI at localhost:8000, click on sources, and add a new source. As the connector type, select MySQL. As demonstrated in the subsequent illustrations, fill in the following configuration fields if you used the instructions above to configure your database in MySQL.

Step 4: Configure a Local JSON Destination in Airbyte
Now, you’ll configure a local JSON destination in Airbyte. Take into account that I use local JSON as a destination for demonstration purposes – as it’s the easiest to set up. For your actual applications, you can select any destination from our ever-growing catalog.
Go to destinations and add a new one. As demonstrated in the following diagram, select Local JSON as the destination type and fill in the following details.
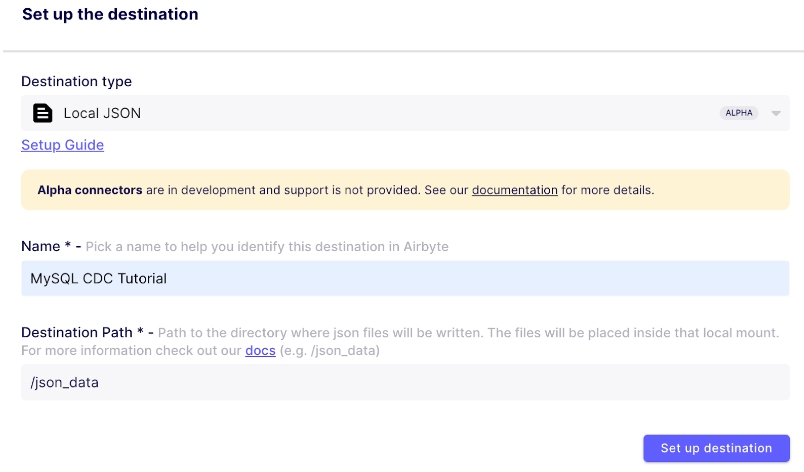
Then click on Set up source and let Airbyte test the destination.
Step 5: Create an Airbyte Connection
Go to Connections and create a new connection. Then, select the existing MySQL source you have just created and then do the same for the Local JSON destination. Once you're done, you can set up the connection as follows.
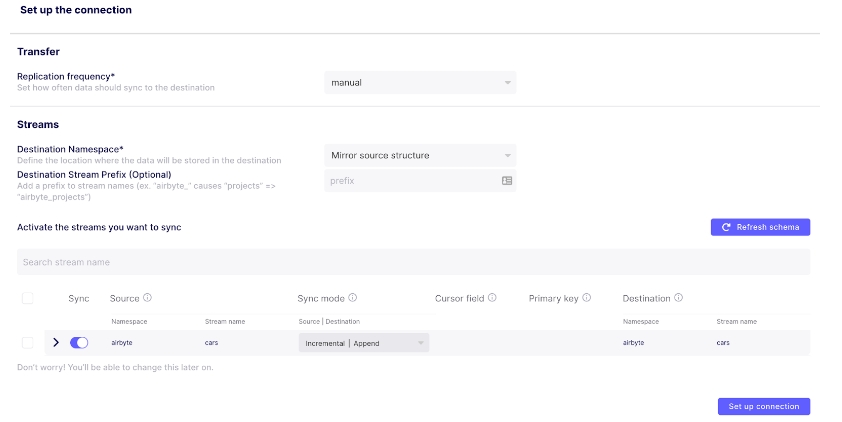
As you can see, I set the replication frequency to manual so I can trigger synchronization on demand. You can change the replication frequency, later on, to sync as frequently as every 5 minutes.
Then, it's time to configure the streams, which in this case are the tables in your database. For now, you only have the cars table. If you expand it, you can see the columns it has.
Now, you should select a sync mode. If you want to take full advantage of performing MySQL CDC, you should use Incremental|Append mode to only look at the rows that have changed in the source and sync them to the destination. Selecting a Full Refresh mode would sync the whole source table, which is most likely not what you want when using CDC. Learn more about sync modes in our documentation.
When using an Incremental sync mode, you would generally need to provide a Cursor field, but when using CDC, that's not necessary since the changes in the source are detected via the Debezium connector stream.
Once you're ready, save the changes. Then, you can run your first sync by clicking on Sync now. You can check your run logs to verify everything is going well. Just wait for the sync to be completed, and that's it! You've replicated data from MySQL using CDC.
Step 6: Verify That the Sync Worked
From the root directory of the Airbyte project, go to tmp/airbyte_local/json_data/, and you will find a file named _airbyte_raw_cars.jsonl where the data from the MySQL database was replicated.
You can check the file's contents in your preferred IDE or run the following command.

Step 7: Test CDC in Action by Creating and Deleting an Object From the Database
Now, let's test the MySQL CDC setup you have configured. To do that, run the following queries to insert and delete a row from the database.

Launch a sync and, once it finishes, check the local JSON file to verify that CDC has captured the change. The JSON file should now have two new lines, showing the addition and deletion of the row from the database.
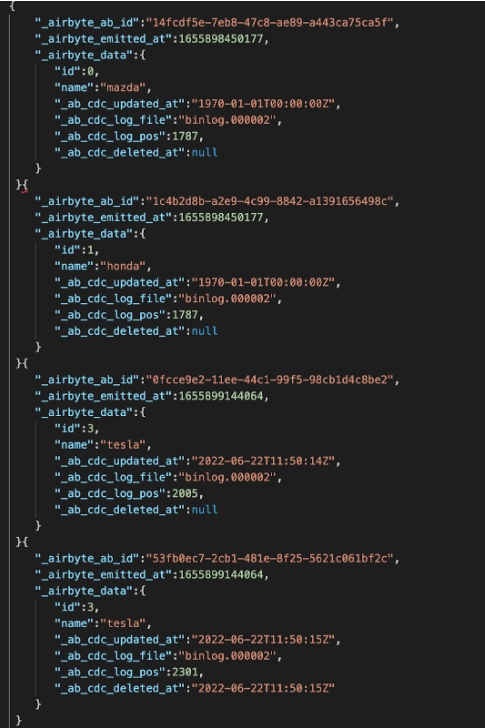
CDC allows you to see that a row was deleted, which would be impossible to detect when using the regular Incremental sync mode. The _ab_cdc_deleted_at meta field not being null means id=3 was deleted.
Wrapping Up
In this tutorial, you have learned what the MySQL binlog is and how Airbyte reads it to implement log-based Change Data Capture (CDC). In addition, you have learned how to configure an Airbyte connection between a MySQL database and a local JSON file.
Published at DZone with permission of Thalia Barrera. See the original article here.
Opinions expressed by DZone contributors are their own.
Comments