Build a Time-Tracking App With ClickUp API Integration Using Openkoda
Learn how to create a time-tracking app with ClickUp API Integration using Openkoda and have a fully functional application up and running in a matter of hours.
Join the DZone community and get the full member experience.
Join For FreeIs it possible to build a time-tracking app in just a few hours? It is, and in this article, I'll show you how!
I’m a senior backend Java developer with 8 years of experience in building web applications. I will show you how satisfying and revolutionary it can be to save a lot of time on building my next one. The approach I use is as follows: I want to create a time-tracking application (I called it Timelog) that integrates with the ClickUp API. It offers a simple functionality that will be very useful here: creating time entries remotely.
In order to save time, I will use some out-of-the-box functionalities that the Openkoda platform offers. These features are designed with developers in mind. Using them, I can skip building standard features that are used in every web application (over and over again). Instead, I can focus on the core business logic.
I will use the following pre-built features for my application needs:
- Login/password authentication
- User and organization management
- Different user roles and privileges
- Email sender
- Logs overview
- Server-side code editor
- Web endpoints creator
- CRUDs generator
Let’s get started!
Timelog Application Overview
Our sample internal application creates a small complex system that can then be easily extended both model-wise and with additional business logic or custom views.
The main focus of the application is to:
- Store the data required to communicate with the ClickUp API.
- Assign users to their tickets.
- Post new time entries to the external API.
To speed up the process of building the application, we relied on some of the out-of-the-box functionalities mentioned above. At this stage, we used the following ones:
- Data model builder (Form) - Allows us to define data structures without the need to recompile the application, with the ability to adjust the data schema on the fly
- Ready-to-use management functionalities - With this one, we can forget about developing things like authentication, security, and standard dashboard view.
- Server-side code editor - Used to develop a dedicated service responsible for ClickUp API integration, it is coded in JavaScript all within the Openkoda UI.
- WebEndpoint builder - Allows us to create a custom form handler that uses a server-side code service to post time tracking entry data to the ClickUp servers instead of storing it in our internal database
Step 1: Setting Up the Architecture
To implement the functionality described above and to store the required data, we designed a simple data model, consisting of the following five entities.
ClickUpConfig, ClickUpUser, Ticket, and Assignment are designed to store the keys and IDs required for connections and messages sent to the ClickUp API. The last one, TimeEntry, is intended to take advantage of a ready-to-use HTML form (Thymeleaf fragment), saving a lot of time on its development.
The following shows the detailed structure of a prepared data model for the Timelog ClickUp integration.
ClickUpConfigapiKey- ClickUp API keyteamId- ID of space in ClickUp to create time entry in
ClickUpUseruserId- Internal ID of a UserclickUpUserId- ID of a user assigned to a workspace in ClickUp
Ticketname- Internal name of the ticketclickUpTicketid- ID of a ticket in ClickUp to create time entries
AssignmentuserId- Internal ID of a UserticketId- Internal ID of a Ticket
TimeEntryuserId- Internal ID of a UserticketId- Internal ID of a ticketdate- Date of a time entrydurationHours- Time entry duration provided in hoursdurationMinutes- Time entry duration provided in minutesdescription- Short description for created time entry
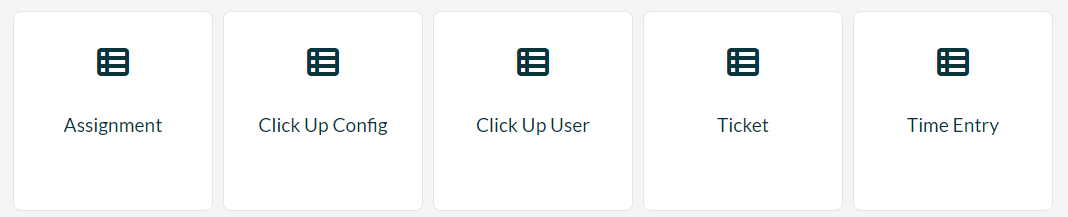
We want to end up with five data tiles on the dashboard:
Step 2: Integrating With ClickUp API
We integrated our application with the ClickUp API specifically using its endpoint to create time entries in ClickUp.
To connect the Timelog app with our ClickUp workspace, it is required to provide the API Key. This can be done using either a personal API token or a token generated by creating an App in the ClickUp dashboard. For information on how to retrieve one of these, see the official ClickUp documentation.
In order for our application to be able to create time entries in our ClickUp workspace, we need to provide some ClickUp IDs:
teamId: This is the first ID value in the URL after accessing your workspace.![First ID value in URL after accessing workspace]()
userId:

- To check the user’s ClickUp ID (Member ID), go to Workspace -> Manage Users.
- On the Users list, select the user’s Settings and then Copy Member ID.
taskId:
- Task ID is accessible in three places on the dashboard: URL, task modal, and tasks list view.
- See the ClickUp Help Center for detailed instructions.
- You can recognize the task ID being prefixed by the
#sign - we use the ID without the prefix.
Step 3: Data Model Magic With Openkoda
Openkoda uses the Byte Buddy library to dynamically build entity and repository classes for dynamically registered entities during the runtime of our Spring Boot application.
Here is a short snippet of entity class generation in Openkoda (a whole service class is available on their GitHub).
dynamicType = new ByteBuddy()
       .with(SKIP_DEFAULTS)
       .subclass(OpenkodaEntity.class)
       .name(PACKAGE + name)
       .annotateType(entity)
       .annotateType(tableAnnotation)
       .defineConstructor(PUBLIC)
       .intercept(MethodCall
        .invoke(OpenkodaEntity.class.getDeclaredConstructor(Long.class))
               .with((Object) null));
Openkoda provides a custom form builder syntax that defines the structure of an entity. This structure is then used to generate both entity and repository classes, as well as HTML representations of CRUD views such as a paginated table with all records, a settings form, and a simple read-only view.
All of the five entities from the data model described earlier have been registered in the same way, only by using the form builder syntax.
The form builder snippet for the Ticket entity is presented below.
a => a
.text("name")
.text("clickUpTaskId")
The definition above results in having the entity named Ticket with a set of default fields for OpenkodaEntity and two custom ones named “name” and “clickUpTaskId”.
The database table structure for dynamically generated Ticket entity is as follows:
                               Table "public.dynamic_ticket"
      Column      |           Type           | Collation | Nullable |        Default
------------------+--------------------------+-----------+----------+-----------------------
 id               | bigint                   |           | not null |
 created_by       | character varying(255)   |           |          |
 created_by_id    | bigint                   |           |          |
 created_on       | timestamp with time zone |           |          | CURRENT_TIMESTAMP
 index_string     | character varying(16300) |           |          | ''::character varying
 modified_by      | character varying(255)   |           |          |
 modified_by_id   | bigint                   |           |          |
 organization_id  | bigint                   |           |          |
 updated_on       | timestamp with time zone |           |          | CURRENT_TIMESTAMP
 click_up_task_id | character varying(255)   |           |          |
 name             | character varying(255)   |           |          |
The last step of a successful entity registration is to refresh the Spring context so it recognizes the new repository beans and for Hibernate to acknowledge entities. It can be done by restarting the application from the Admin Panel (section Monitoring).
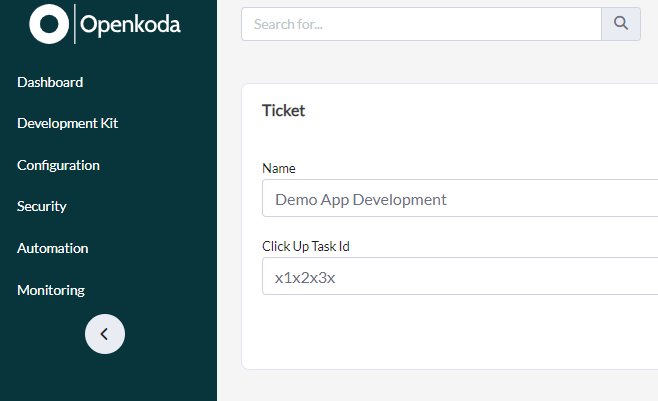
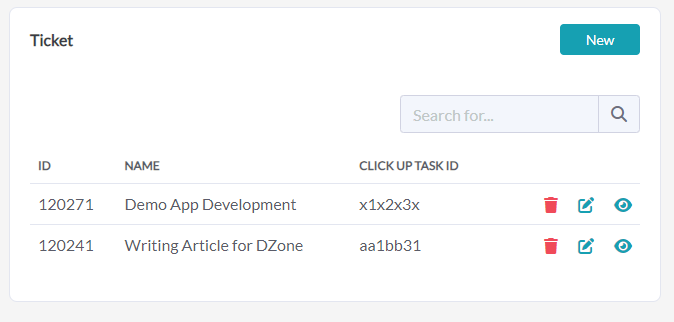
Our final result is an auto-generated full CRUD for the Ticket entity.
Auto-generated Ticket settings view:
Auto-generated all Tickets list view:
Step 4: Setting Up Server-Side Code as a Service
We implemented ClickUp API integration using the Openkoda Server-Side Code keeping API calls logic separate as a service. It is possible to use the exported JS functions further in the logic of custom form view request handlers.
Then we created a JavaScript service that delivers functions responsible for ClickUp API communication. Openkoda uses GraalVM to run any JS code fully on the backend server.
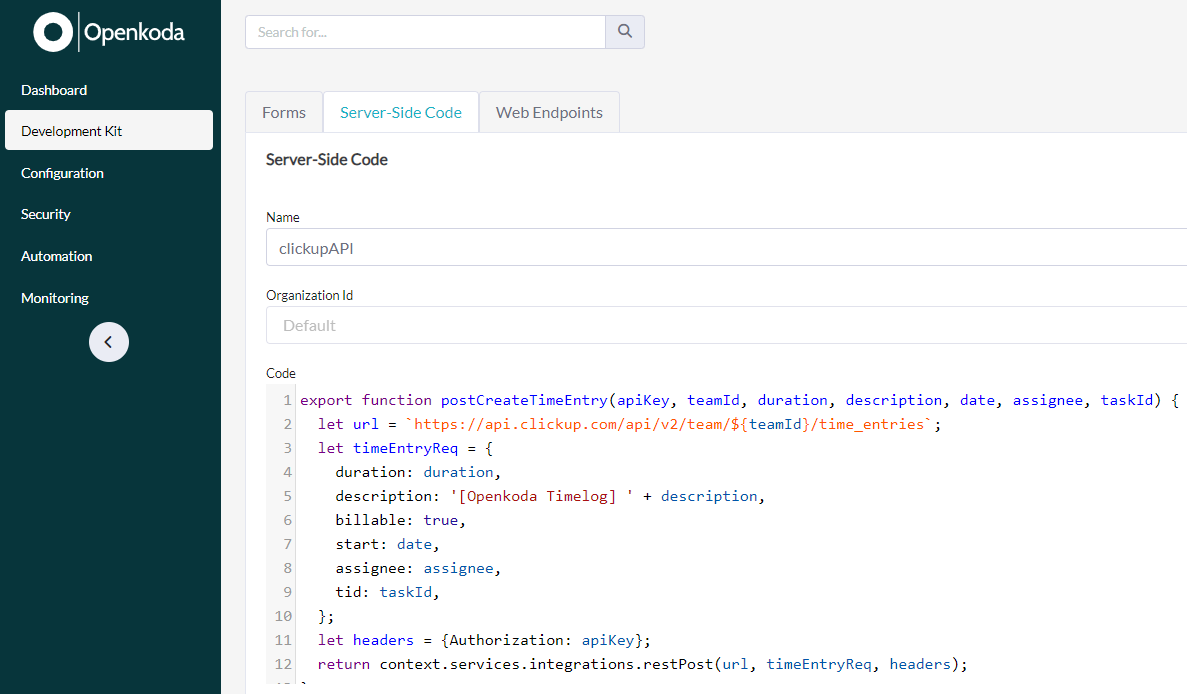
Our ClickupAPI server-side code service has only one function (postCreateTimeEntry) which is needed to meet our Timelog application requirements.
export function postCreateTimeEntry(apiKey, teamId, duration, description, date, assignee, taskId) {
  let url = `https://api.clickup.com/api/v2/team/${teamId}/time_entries`;
  let timeEntryReq = {
      duration: duration,
      description: '[Openkoda Timelog] ' + description,
      billable: true,
      start: date,
      assignee: assignee,
      tid: taskId,
  };
  let headers = {Authorization: apiKey};
  return context.services.integrations.restPost(url, timeEntryReq, headers);
}
To use such a service later on in WebEndpoints, it is easy enough to follow the standard JS import expression import * as clickupAPI from 'clickupAPI';.
Step 5: Building Time Entry Form With Custom GET/POST Handlers
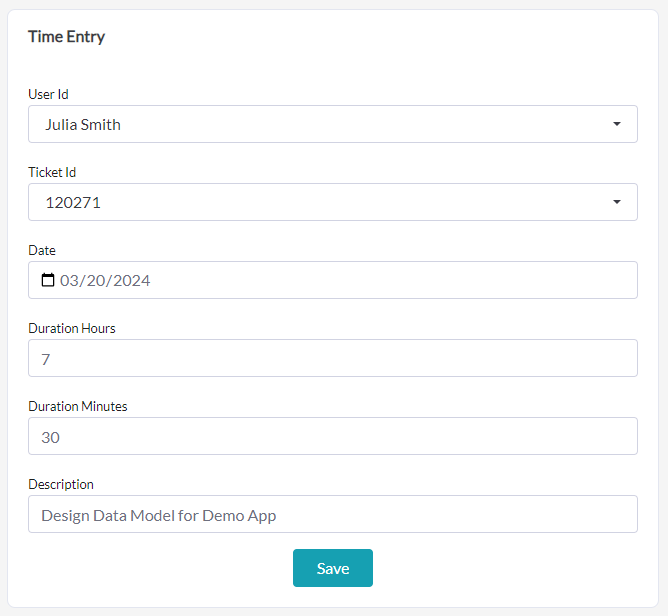
Here, we prepare the essential screen for our demo application: the time entry form which posts data to the ClickUp API. All is done in the Openkoda user interface by providing simple HTML content and some JS code snippets.

The View
The HTML fragment is as simple as the one posted below. We used a ready-to-use form Thymeleaf fragment (see form tag) and the rest of the code is a standard structure of a Thymeleaf template.
<!--DEFAULT CONTENT-->
<!DOCTYPE html>
<html xmlns:th="http://www.thymeleaf.org" xmlns:layout="http://www.ultraq.net.nz/thymeleaf/layout" lang="en" layout:decorate="~{${defaultLayout}}">
<body>
<div class="container">
    <h1 layout:fragment="title"/>
    <div layout:fragment="content">
          <form th:replace="~{generic-forms::generic-form(${TimeEntry}, 'TimeEntry', '', '', '', 'Time Entry', #{template.save}, true)}"></form>
    </div>
</div>
</body>
</html>
HTTP Handlers
Once having a simple HTML code for the view, we need to provide the actual form object required for the generic form fragment (${TimeEntry}).
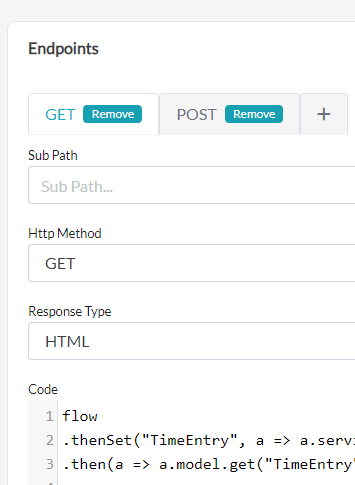
We do it inside a GET endpoint as a first step, and after that, we set the currently logged user ID so there’s a default value selected when entering the time entry view.
flow
.thenSet("TimeEntry", a => a.services.data.getForm("TimeEntry"))
.then(a => a.model.get("TimeEntry").dto.set("userId", a.model.get("userEntityId")))
Lastly, the POST endpoint is registered to handle the actual POST request sent from the form view (HTML code presented above). It implements the scenario where a user enters the time entry form, provides the data, and then sends the data to the ClickUp server.
The following POST endpoint JS code:
- Receives the form data.
- Reads the additional configurations from the internal database (like API key, team ID, or ClickUp user ID).
- Prepares the data to be sent.
- Triggers the
clickupAPIservice to communicate with the remote API.
import * as clickupAPI from 'clickupAPI';

flow
.thenSet("clickUpConfig", a => a.services.data.getRepository("clickupConfig").search( (root, query, cb) => {
            let orgId = a.model.get("organizationEntityId") != null ? a.model.get("organizationEntityId") : -1;
            return cb.or(cb.isNull(root.get("organizationId")), cb.equal(root.get("organizationId"), orgId));
        }).get(0)
    )
.thenSet("clickUpUser", a => a.services.data.getRepository("clickupUser").search( (root, query, cb) => {
            let userId = a.model.get("userEntityId") != null ? a.model.get("userEntityId") : -1;
            return cb.equal(root.get("userId"), userId);
        })
)
.thenSet("ticket", a => a.form.dto.get("ticketId") != null ? a.services.data.getRepository("ticket").findOne(a.form.dto.get("ticketId")) : null)
.then(a => {
    let durationMs = (a.form.dto.get("durationHours") != null ? a.form.dto.get("durationHours") * 3600000 : 0)
        + (a.form.dto.get("durationMinutes") != null ? a.form.dto.get("durationMinutes") * 60000 : 0);
    return clickupAPI.postCreateTimeEntry(
        a.model.get("clickUpConfig").apiKey,
        a.model.get("clickUpConfig").teamId,
        durationMs,
        a.form.dto.get("description"),
        a.form.dto.get("date") != null ? (new Date(a.services.util.toString(a.form.dto.get("date")))).getTime() : Date.now().getTime(),
        a.model.get("clickUpUser").length ? a.model.get("clickUpUser").get(0).clickUpUserId : -1,
        a.model.get("ticket") != null ? a.model.get("ticket").clickUpTaskId : '')
})
Step 6: Our Application Is Ready!
This is it!
I built a complex application that is capable of storing the data of users, assignments to their tickets, and any properties required for ClickUp API connection. It provides a Time Entry form that covers ticket selection, date, duration, and description inputs of a single time entry and sends the data from the form straight to the integrated API.
Not to forget about all of the pre-built functionalities available in Openkoda like authentication, user accounts management, logs overview, etc. As a result, the total time to create the Timelog application was only a few hours.
What I have built is just a simple app with one main functionality. But there are many ways to extend it, e.g., by adding new structures to the data model, by developing more of the ClickUp API integration, or by creating more complex screens like the calendar view below.
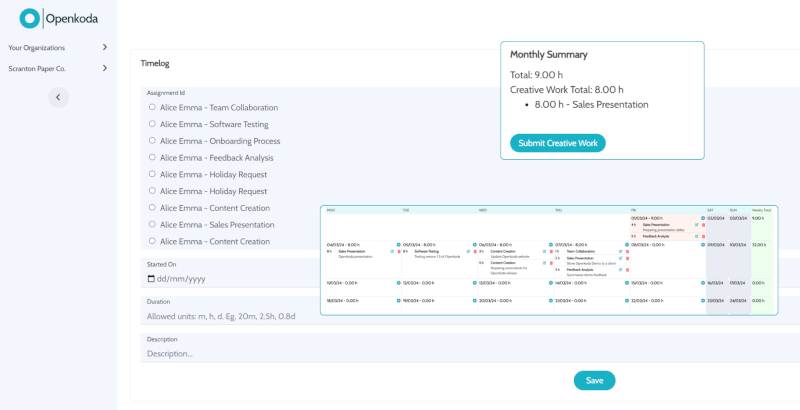
If you follow almost exactly the same scenario as I presented in this case, you will be able to build any other simple (or not) business application, saving time on repetitive and boring features and focusing on the core business requirements.
I can think of several applications that could be built in the same way, such as a legal document management system, a real estate application, a travel agency system, just to name a few.
As an experienced software engineer, I always enjoy implementing new ideas and seeing the results quickly. In this case, that is all I did. I spent the least amount of time creating a fully functional application tailored to my needs and skipped the monotonous work.
The .zip package with all code and configuration files are available on my GitHub.
Opinions expressed by DZone contributors are their own.
Comments