Consuming GraphQL API With React.js
If you have created your GraphQL APIs and are looking to consume them in a React front-end, learn how to consume your GraphQL API using React.js in this post.
Join the DZone community and get the full member experience.
Join For FreeGraphQL is a query language that allows clients to request exactly the data they need and nothing more. This approach is more efficient than REST. This is because its structure allows for flexible data-fetching techniques. If you have created your GraphQL APIs and are looking to consume them in a React front-end, you have come to the right place. This article will teach you how to consume your GraphQL API using React.js.
Prerequisites
To continue in this article, it is helpful to have the following:
- Node.js installed on your computer
- Prior experience working with JavaScript and GraphQL
- You will require a working GraphQL API. For demonstration purposes, this guide will use Fruit GraphQL API to interact with its data using React.js.
Setting Up the Application
To create a React.js application, launch your terminal from your preferred working directory and run the npx create-react-app command as follows:
npx create-react-app fruits_app
This command will use the create-react-app package to set up a new React application. The command will install all the necessary dependencies and configuration files to get a basic React application up and running.
Once the setup process is completed, navigate to the newly created fruits_app directory to proceed with the next steps:
cd fruits_app
Along this guide, you will be required to install the following dependencies:
- Apollo Client: For provisioning GraphQL client functionalities
- GraphQL: For writing GraphQL mutation and query
React-router-dom: For redirecting to pages
To install them, execute the following command in your fruits_app directory:
npm i @apollo/client graphql react-router-dom
Setting Up the Components
Before diving in and interacting with data, let's first build the application skeleton to streamline the app. In the project's directory, create a components directory. The components directory will host two files, namely:
Layout.js: For defining the application layoutNavbar.js: For the application's navbar
Go ahead and create the above files in the designated directory.
Below is how the application's navbar will look like in the Navbar.js:
import React from 'react'

export default function Navbar() {
return (
    <nav className='navbar'>
        <div>
            <div className='navbar-brand'>
                Fruits App
            </div>
            <div className='nav-links'>
                <ul>
                    <li>
                        <a href="/">Fruits</a>
                    </li>
                    <li>
                        <a href="/add-fruit">Add Fruit</a>
                    </li>
                </ul>
            </div>
        </div>
    </nav>
)
}
Layout.js will build the application layout as follows:
import React from 'react';
import Navbar from './Navbar';

export default function Layout({children}) {
    return (
        <div>
            <Navbar/>
            {children}
        </div>
    )
}- Modify
App.cssto add the styles for the navbar:
.navbar{    width: 100%;    padding: 20px;    border-bottom: 1px solid #d4d4d4;
}

.navbar div{    display: flex;    justify-content: center;
}

.navbar .navbar-brand{    width: 30%;    font-weight: bold;
}

.navbar .nav-links{    width: 70%;
}

.navbar .nav-links ul{    display: flex;    padding: 0px;    margin:0px;    list-style-type: none;
}

.navbar .nav-links ul li{    margin-right: 10px;
}

.navbar .nav-links ul li a{    text-decoration: none;
}
Similarly, in the project directory, create a pages directory. In the directory, create two files, i.e.:
Fruits.js: This will serve as the application home page to interact with GraphQL queries.AddFruit.js: This will create a simple form for adding a fruit page to interact with GraphQL mutation.
For the application to access the above files, navigate to the src/App.js and add the following changes:
- Import the necessary packages:
import {BrowserRouter,Routes,Route} from 'react-router-dom';
import Layout from './components/Layout';
import Fruits from './pages/Fruits';
import AddFruit from './pages/AddFruit';- Inside the render function: Define a component that will be rendered in case of a route that does not exist:
const NoPage = () => <p>No such page exists</p>
- Finally, return the routes definition:
<BrowserRouter>
    <Routes>
        <Route path="/" element={<Layout />}/>
        <Route index element={<Fruits />} />
        <Route path="/add-fruit" element={<AddFruit />} />
        <Route path="*" element={NoPage} />
    </Routes>
</BrowserRouter>
Configuring Apollo Client
Let's now dive in and handle the GraphQL functionality on the React front end. To consume GraphQL with React, you will need to use the Apollo Client that we installed earlier.
Apollo Server is a flexible GraphQL client for any front-end frameworks such as React, Angular, Vue.js, and React Native. Apollo Client provides features such as caching, real-time subscriptions, and automatic data management that make it easy to work with GraphQL data in your application.
To configure Apollo Client, navigate to the index.js and import the @apollo/client features as follows:
import {ApolloClient,InMemoryCache,ApolloProvider} from '@apollo/client';
In the same file, define the Apollo Client:
const client = new ApolloClient({
    uri:'https://fruits-api.netlify.app/graphql',
    cache: new InMemoryCache()
})
Encapsulate the rendered components with the Apollo Provider component as follows:
root.render(
<ApolloProvider client={client}>
    <React.StrictMode>
    <App />
    </React.StrictMode>
</ApolloProvider>
);
Getting All Fruits
Let's now start interacting with the GrapgQL data. To fetch the fruit data from the API, navigate to the pages/Fruits.js files and implement the following changes:
- Import the necessary packages:
import {useQuery,gql} from '@apollo/client';
import Layout from '../components/Layout';
import '../App.css';- Define a GraphQL query for getting the fruits:
const GET_FRUITS = gql`
    query fruits{
    fruits{
        id
        tree_name
        scientific_name
        family
        origin
    }
    }
`;- Define a render function:
function App() {
}
Inside the above render function, make the following the following changes:
- Send the query for fetching the data as follows:
const {loading,error,data} = useQuery(GET_FRUITS);- Check whether it is loading or there is an error when getting the data:
if(loading) return <p>Loading...</p>;
if(error) return <p>Error: {error.message}</p>- Render the fruits and display them on React as follows:
return (
    <Layout>
    <div className="App">
        {
        data.fruits.map(({id,tree_name,scientific_name,family,origin}) => (
            <div key={id} className="fruitCard">
            <h3>Name: {tree_name}</h3>
            <h4>Scientific name: {scientific_name}</h4>
            <h5>Family: {family}</h5>
            <h5>Origin: {origin}</h5>
            </div>
        ))
        }
    </div>
    </Layout>
);
Modify App.css to have a style for fruitCard:
.fruitCard{
    text-align: left;
    border: 1px solid #d4d4d4;
    margin-left: 10px;
    margin-bottom: 10px;
    margin-top:10px;
    padding:10px;
}
Now ensure the development server is running by executing the following command:
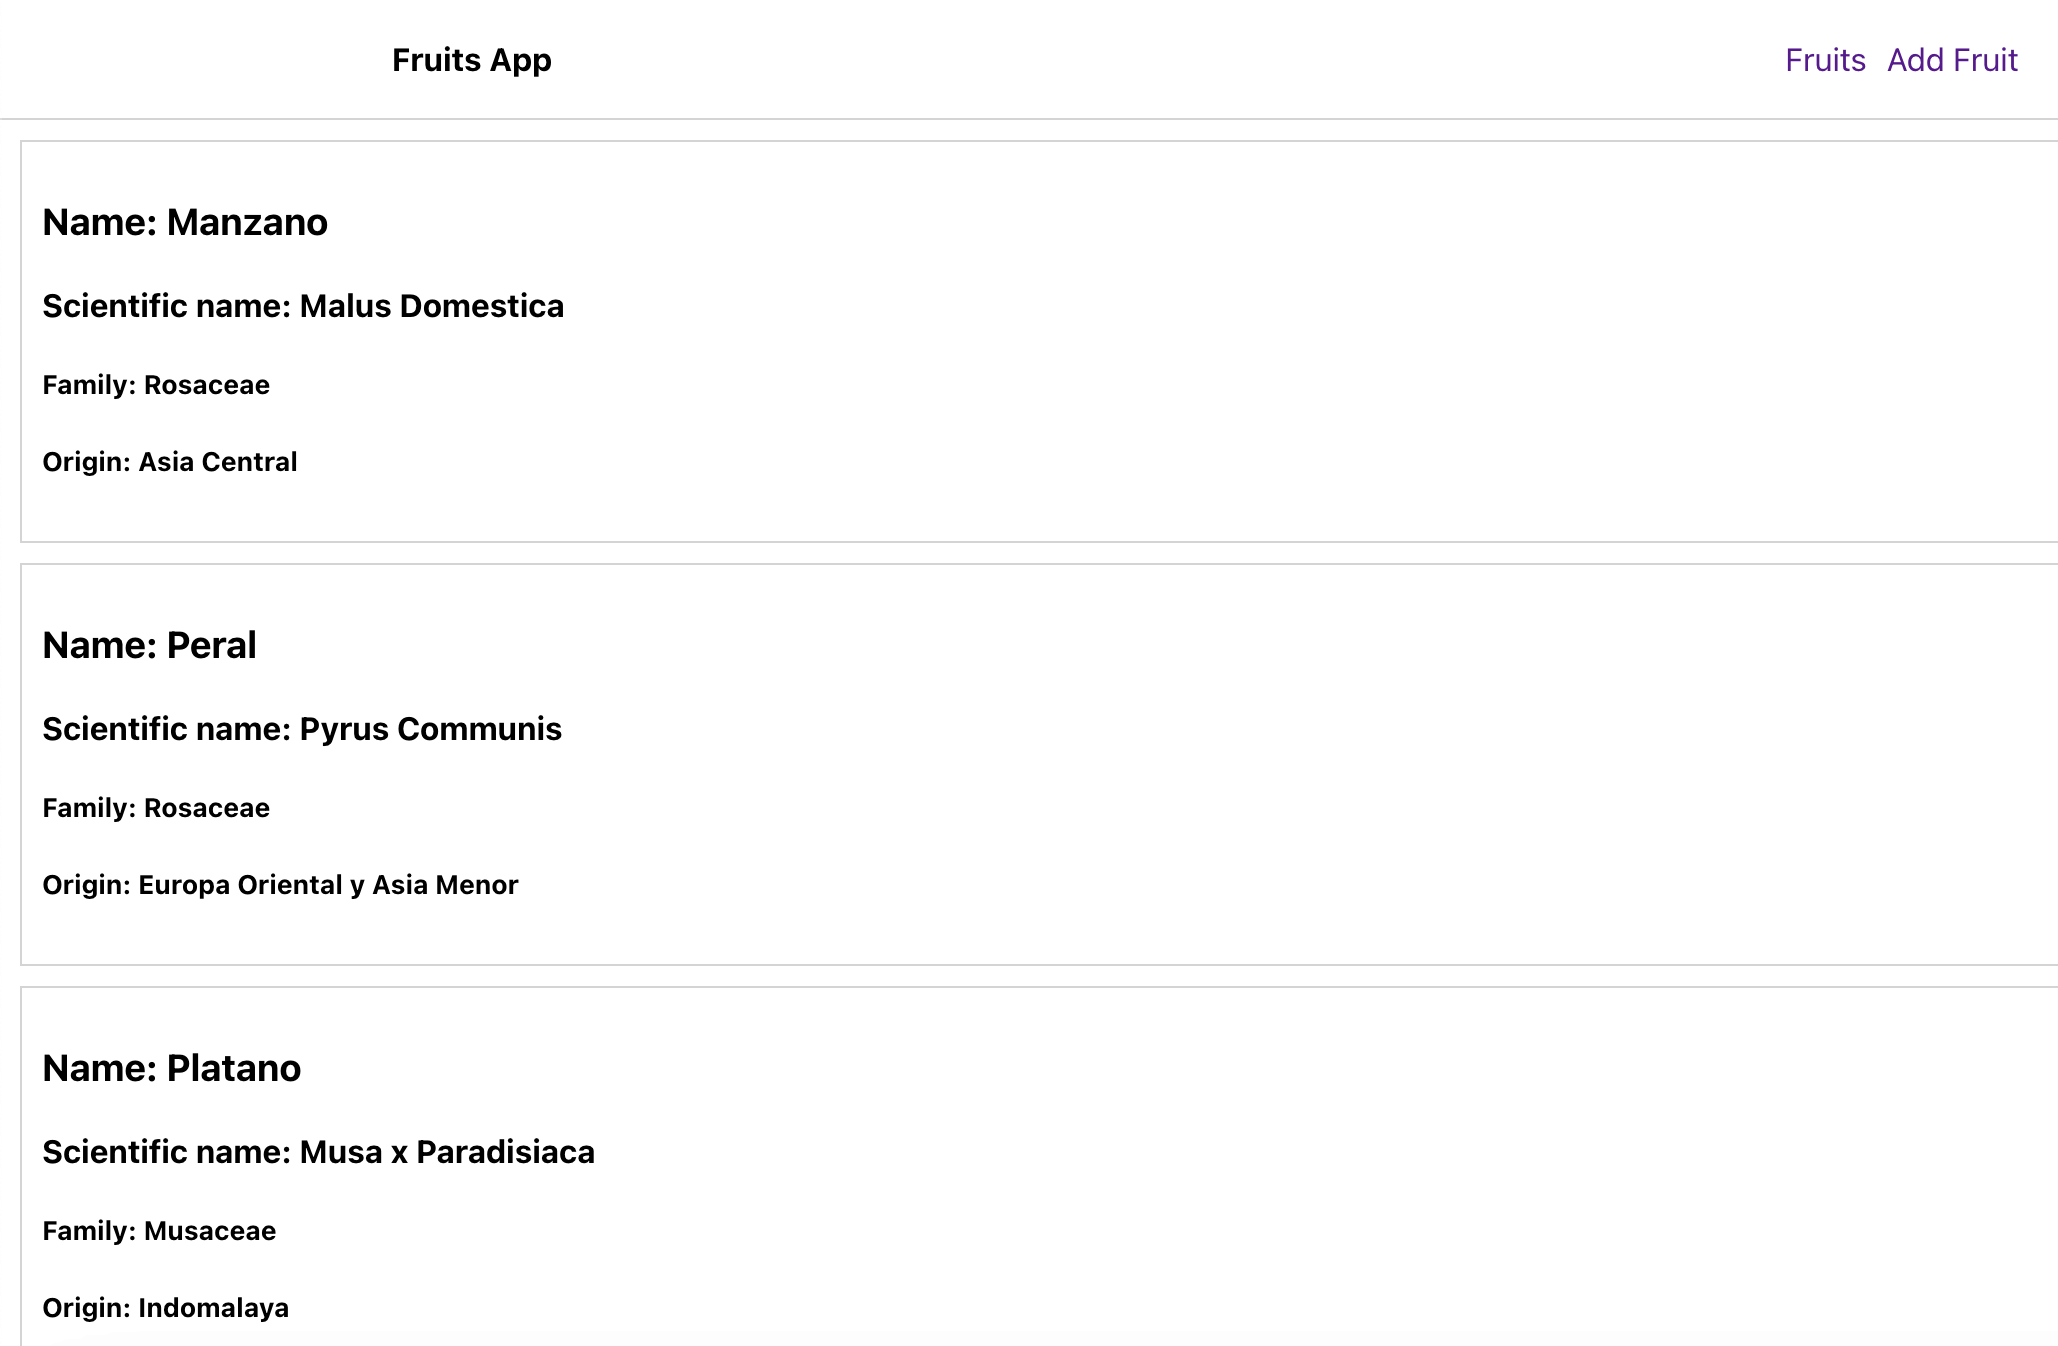
npm run startOpening http://localhost:3000/ on the browser, React should be able to display the data as follows:
Adding a Fruit
Adding data using a GrapgQl API involves sending a mutation. Mutations Resolvers allow changing your data. This includes adding, deleting, or updating the API data. To add data, navigate to pages/AddFruit.js and make the following changes:
- Import the necessary packages:
import React,{useState} from 'react';
import {gql,useMutation} from '@apollo/client';
import Layout from '../components/Layout';
import '../App.css';- Define a render function:
export default function AddFruit() {
}- Define the states for the form elements:
const [id,setId] = useState();
const [scientific_name,setScientificName] = useState();
const [tree_name,setTreeName] = useState();
const [fruit_name,setFruitName] = useState();
const [family,setFamily] = useState();
const [origin,setOrigin] = useState();
const [description,setDescription] = useState();
const [bloom,setBloom] = useState();
const [maturation_fruit,setMaturationFruit] = useState();
const [life_cycle,setLifeCycle] = useState();
const [climatic_zone,setClimaticZone] = useState();
const [formError,setFormError] = useState();
const [message,setMessage] = useState("");- Define the GraphQL mutation query:
const newFruit = gql`
    mutation addFruit($id:ID!,
        $scientific_name:String!,
        $tree_name:String!,
        $fruit_name:String!,
        $family:String!,
        $origin:String!,
        $description:String!,
        $bloom:String!,
        $maturation_fruit:String!,
        $life_cycle:String!,
        $climatic_zone:String!){
        addFruit(id:$id,
        scientific_name:$scientific_name,
        tree_name:$tree_name,
        fruit_name:$fruit_name,
        family:$family,
        origin:$origin,
        description:$description,
        bloom:$bloom,
        maturation_fruit:$maturation_fruit,
        life_cycle:$life_cycle,
        climatic_zone:$climatic_zone
        ){
        id
        scientific_name
        tree_name
        family
        }
    }
`;- Define the function for handling the mutation:
const [addFruit,{data,loading,error}] = useMutation(newFruit);- Define the
onSubmitfunction:
const onSubmit = e => {
    e.preventDefault();
    if(id && scientific_name && tree_name && fruit_name && family && origin && description && bloom && maturation_fruit && life_cycle && climatic_zone){
        addFruit({variables:{
        id,scientific_name,tree_name,fruit_name,family,origin,description,bloom,maturation_fruit,life_cycle,climatic_zone
        }});
        if(!loading && !error){
        setMessage("Fruit added successfully");
        console.log("data ",data);
        setId('');
        setScientificName('');
        setTreeName('');
        setFruitName('');
        setFamily('');
        setOrigin('');
        setDescription('');
        setBloom('');
        setMaturationFruit('');
        setLifeCycle('');
        setClimaticZone('');
        }
    }else{
    setFormError('All fields are required');
    return;
    }
}- Render the form view:
return (
    <Layout>
    <div className='form-container'>
        <form onSubmit={onSubmit}>
        {
            formError && (
            <div className='form-body'>
                <div className='error'>
                <p>{formError}</p>
                </div>
            </div>
            )
        }
        {
            error && (
            <div className='form-body'>
                <div className='error'>
                <p>{formError}</p>
                </div>
            </div>
            )
        }
        {
            message && (
            <div className='form-body'>
                <div className='message'>
                <p>{message}</p>
                </div>
            </div>
            )
        }
        <div className='form-body'>
            <label>ID</label>
            <input type="text" className='form-control' onChange={e => setId(e.target.value)} value={id} placeholder="Fruit ID"/>
        </div>
        <div className='form-body'>
            <label>Scientific Name</label>
            <input type="text" className='form-control' onChange={e => setScientificName(e.target.value)} value={scientific_name} placeholder="Fruit Scientific Name"/>
        </div>
        <div className='form-body'>
            <label>Tree Name</label>
            <input type="text" className='form-control' onChange={e => setTreeName(e.target.value)} value={tree_name} placeholder="Fruit Tree Name"/>
        </div>
        <div className='form-body'>
            <label>Fruit Name</label>
            <input type="text" className='form-control' onChange={e => setFruitName(e.target.value)} value={fruit_name} placeholder="Fruit Name"/>
        </div>
        <div className='form-body'>
            <label>Fruit Family</label>
            <input type="text" className='form-control' onChange={e => setFamily(e.target.value)} value={family} placeholder="Fruit Family"/>
        </div>
        <div className='form-body'>
            <label>Fruit Origin</label>
            <input type="text" className='form-control' onChange={e => setOrigin(e.target.value)} value={origin} placeholder="Fruit Origin"/>
        </div>
        <div className='form-body'>
            <label>Fruit Description</label>
            <input type="text" className='form-control' onChange={e => setDescription(e.target.value)} value={description} placeholder="Fruit Description"/>
        </div>
        <div className='form-body'>
            <label>Fruit Bloom</label>
            <input type="text" className='form-control' onChange={e => setBloom(e.target.value)} value={bloom} placeholder="Fruit Bloom"/>
        </div>
        <div className='form-body'>
            <label>Fruit Maturation Fruit</label>
            <input type="text" className='form-control' onChange={e => setMaturationFruit(e.target.value)} value={maturation_fruit} placeholder="Fruit Maturation Fruit"/>
        </div>
        <div className='form-body'>
            <label>Fruit Life Cycle</label>
            <input type="text" className='form-control' onChange={e => setLifeCycle(e.target.value)} value={life_cycle} placeholder="Fruit Life Cycle"/>
        </div>
        <div className='form-body'>
            <label>Fruit Climatic Zone</label>
            <input type="text" className='form-control' onChange={e => setClimaticZone(e.target.value)} value={climatic_zone} placeholder="Fruit Climatic Zone"/>
        </div>
        <div className='form-body'>
            <button type="submit">{
            loading ? "Loading..." : "Submit"
            }</button>
        </div>
        </form>
    </div>
    </Layout>
)
From your web page, click on add fruit link on the navbar:

On your fruit's page, you should have a new entry on your app as follows:

Conclusion
Now you have mastered consuming GraphQL API with React.js. I hope you love it!
Comments