Creating a ListView Parallax Effect With a Sticky Header in Android
This Android tutorial will help you create a parallax animation that sticks to the top of a list when scrolled.
Join the DZone community and get the full member experience.
Join For FreeIn our previous tutorial, I showed how to create a ListView Header Parallax Animation. Now in this example, we will go a little further and make the list header parallax animation with a view that sticks to the top when the list is scrolled.
You need to follow the following steps as described below to create the list view parallax effect.
1. Declare Activity Layout
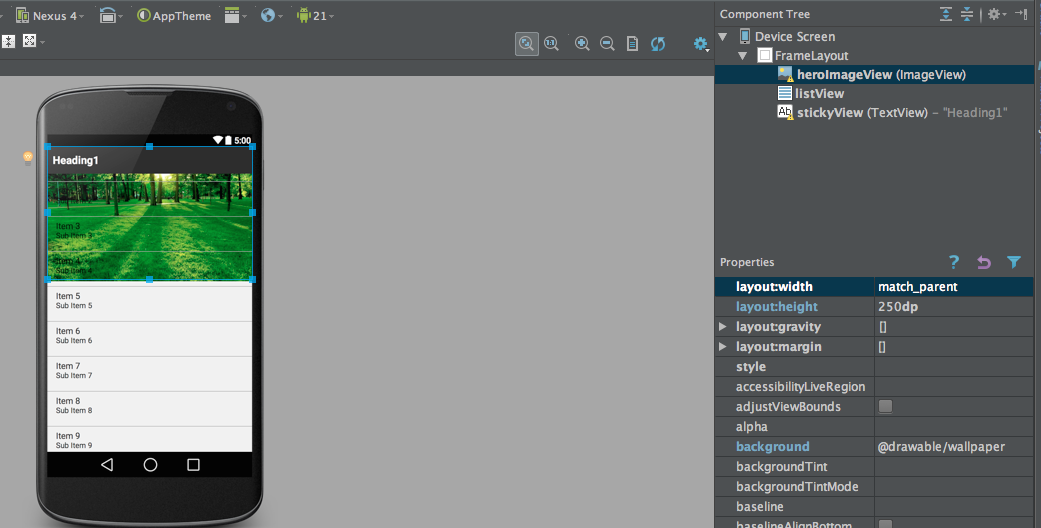
To begin with, let's start by declaring your activity layout. It is a bit tricky. Let us take a frame layout that hosts the hero image, a sticky view, and a ListView.
<FrameLayout xmlns:android="http://schemas.android.com/apk/res/android"
    android:layout_width="match_parent"
    android:layout_height="match_parent">

    <ImageView
        android:id="@+id/heroImageView"
        android:layout_width="match_parent"
        android:layout_height="250dp"
        android:background="@drawable/wallpaper"
        android:scaleType="fitCenter" />

    <ListView
        android:id="@+id/listView"
        android:layout_width="match_parent"
        android:layout_height="wrap_content"
        android:divider="#9E9E9E"
        android:dividerHeight="1dp"
        android:scrollbars="none"></ListView>

    <TextView
        android:id="@+id/stickyView"
        android:layout_width="match_parent"
        android:layout_height="50dp"
        android:background="#222"
        android:gravity="center_vertical"
        android:paddingLeft="10dp"
        android:text="Heading1"
        android:textColor="#fff"
        android:textSize="20sp"
        android:textStyle="bold" />
</FrameLayout>
The following screenshot depicts how our activity layout is defined.
2. Declare List Header Layout
Now declare the layout for the list header. In this example, I have declared an ImageView inside FrameLayout. The header view is declared as follows.
<?xml version="1.0" encoding="utf-8"?>
<LinearLayout xmlns:android="http://schemas.android.com/apk/res/android"
    android:layout_width="match_parent"
    android:layout_height="match_parent"
    android:orientation="vertical">

    <Space
        android:layout_width="match_parent"
        android:layout_height="250dp" />

    <Space
        android:id="@+id/stickyViewPlaceholder"
        android:layout_width="match_parent"
        android:layout_height="50dp" />

</LinearLayout>
Notice that in the above header layout:
- We have declared
Spaceobjects. The Android Space widget is a subclass ofView,used to occupy invisible, transparent space on the screen. You cannot apply any style, such as color, background, etc. - The height of both
Spaceobjects is the same as the height of the hero image and sticky widget as declared in your activity layout. - These two invisible views will be useful for calculating the view position and will help to create the parallel effect.
3. Declare List Row Layout
Declare another layout for your list view row. In this example, for the sake of simplicity, I have declared a simple TextView. You may design a fancy list of your choice by declaring your own custom adapter.
<?xml version="1.0" encoding="utf-8"?>
<TextView xmlns:android="http://schemas.android.com/apk/res/android"
    android:layout_width="match_parent"
    android:layout_height="wrap_content"
    android:background="#FAFAFA"
    android:gravity="center_vertical"
    android:text="List Item"
    android:padding="8dp"
    android:minHeight="40dp"
    android:textColor="#222"/>
4. Handle ListView Scroll Events
The following step will guide you with the necessary things required in your activity to create a list view, add a list header, and implement the parallax effect.
- Implement
setOnScrollListenerfor your list view to handle the user scroll event. - Calculate the position of the sticky header view according to the position of the first item in the
ListView. - When the first item has already reached the top, you don’t need to re-position the sticky header view.
- Set the hero image to scroll half of the amount of the
ListView.
import android.content.Context;
import android.os.Bundle;
import android.support.v7.app.ActionBarActivity;
import android.view.LayoutInflater;
import android.view.View;
import android.widget.AbsListView;
import android.widget.ArrayAdapter;
import android.widget.ListView;
import android.widget.TextView;
import java.util.ArrayList;
import java.util.List;

/**
 * <p/>
 * Calculate the position of the sticky header view according to the
 * position of the first item in the ListView. When the first item is already
 * reached to top, you don't need to position the sticky header view.
 *
 * @author Nilanchala
 */
public class MainActivity extends ActionBarActivity {

    private TextView stickyView;
    private ListView listView;
    private View heroImageView;

    private View stickyViewSpacer;

    private int MAX_ROWS = 20;

    @Override
    protected void onCreate(Bundle savedInstanceState) {
        super.onCreate(savedInstanceState);
        setContentView(R.layout.activity_main);

        /* Initialise list view, hero image, and sticky view */
        listView = (ListView) findViewById(R.id.listView);
        heroImageView = findViewById(R.id.heroImageView);
        stickyView = (TextView) findViewById(R.id.stickyView);

        /* Inflate list header layout */
        LayoutInflater inflater = (LayoutInflater) getSystemService(Context.LAYOUT_INFLATER_SERVICE);
        View listHeader = inflater.inflate(R.layout.list_header, null);
        stickyViewSpacer = listHeader.findViewById(R.id.stickyViewPlaceholder);

        /* Add list view header */
        listView.addHeaderView(listHeader);

        /* Handle list View scroll events */
        listView.setOnScrollListener(new AbsListView.OnScrollListener() {

            @Override
            public void onScrollStateChanged(AbsListView view, int scrollState) {
            }

            @Override
            public void onScroll(AbsListView view, int firstVisibleItem, int visibleItemCount, int totalItemCount) {

                /* Check if the first item is already reached to top.*/
                if (listView.getFirstVisiblePosition() == 0) {
                    View firstChild = listView.getChildAt(0);
                    int topY = 0;
                    if (firstChild != null) {
                        topY = firstChild.getTop();
                    }

                    int heroTopY = stickyViewSpacer.getTop();
                    stickyView.setY(Math.max(0, heroTopY + topY));

                    /* Set the image to scroll half of the amount that of ListView */
                    heroImageView.setY(topY * 0.5f);
                }
            }
        });


        /* Populate the ListView with sample data */
        List<String> modelList = new ArrayList<>();
        for (int i = 0; i < MAX_ROWS; i++) {
            modelList.add("List item " + i);
        }

        ArrayAdapter adapter = new ArrayAdapter(this, R.layout.list_row, modelList);
        listView.setAdapter(adapter);
    }
}
Feel free to download the source code for this project from GitHub here.
Published at DZone with permission of Nilanchala Panigrahy, DZone MVB. See the original article here.
Opinions expressed by DZone contributors are their own.
Comments