How To Automate Shadow DOM in Selenium WebDriver
This Selenium WebDriver tutorial discusses shadow DOM elements and how to automate Shadow DOM in Selenium WebDriver.
Join the DZone community and get the full member experience.
Join For FreeI came across one of the test cases in my previous projects where I had to click on a button to navigate to the next page. I searched for the element locator of the button on the page and ran the tests hoping it would click the button and navigate to the next page.
But to my surprise, the test failed as it couldn’t locate the element, and I received NoSuchElementException in the console logs. I was not happy to see that error as it was a simple button that I was trying to click, and there was no complexity.
On analyzing the issue further, expanding the DOM, and checking the root elements, I found that the button locator was inside the #shadow-root(open) tree node, which made me realize that it needs to be handled differently as it is a Shadow DOM element.
In this Selenium WebDriver tutorial, we will discuss Shadow DOM elements and how to automate Shadow DOM in Selenium WebDriver. Before we move on to automating Shadow DOM in Selenium, let’s first understand what Shadow DOM is. And Why is it used?
What Is Shadow DOM?
Shadow DOM is a functionality that allows the web browser to render DOM elements without putting them into the main document DOM tree. This creates a barrier between what the developer and the browser can reach; the developer cannot access the Shadow DOM the same way they would with nested elements, while the browser can render and modify that code the same way it would with nested elements.
The Shadow DOM is a way to achieve encapsulation in the HTML document. By implementing it, you can keep the style and behavior of one part of the document hidden and separate from the other code of the same document so that there is no interference.
Shadow DOM allows hidden DOM trees to be attached to elements in the regular DOM tree — the Shadow DOM tree starts with a Shadow root, underneath which you can attach any element in the same way as the normal DOM.
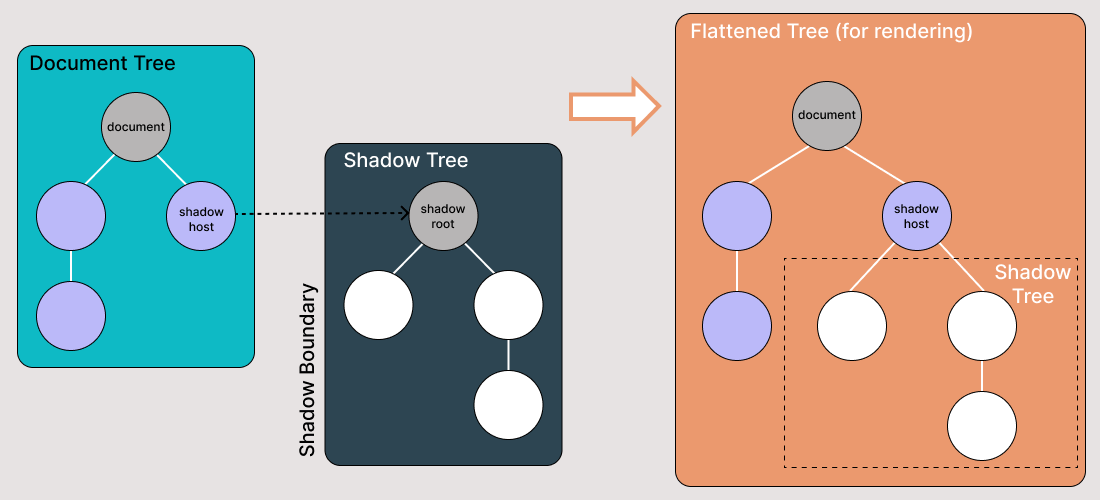
There are some bits of Shadow DOM terminology to be aware of:
- Shadow host: The regular DOM node to which the Shadow DOM is attached
- Shadow tree: The DOM tree inside the Shadow DOM
- The shadow boundary is where the Shadow DOM ends, and the regular DOM begins.
- Shadow root: The root node of the Shadow tree
What Is the Usage of Shadow DOM?
Shadow DOM serves for encapsulation. It allows a component to have its own “shadow” DOM tree that can’t be accidentally accessed from the main document, may have local style rules, and more.
Here are some of the essential properties of Shadow DOM:
- Have their own ids space
- Invisible to JavaScript selectors from the main document, such as querySelector
- Use styles only from the shadow tree, not from the main document
Finding Shadow DOM Elements Using Selenium WebDriver
When we try to find the Shadow DOM elements using Selenium locators, we get NoSuchElementException as it is not directly accessible to the DOM.
We would use the following strategy to access the Shadow DOM locators:
- Using JavaScriptExecutor.
- Using Selenium WebDriver’s
getShadowDom()method.
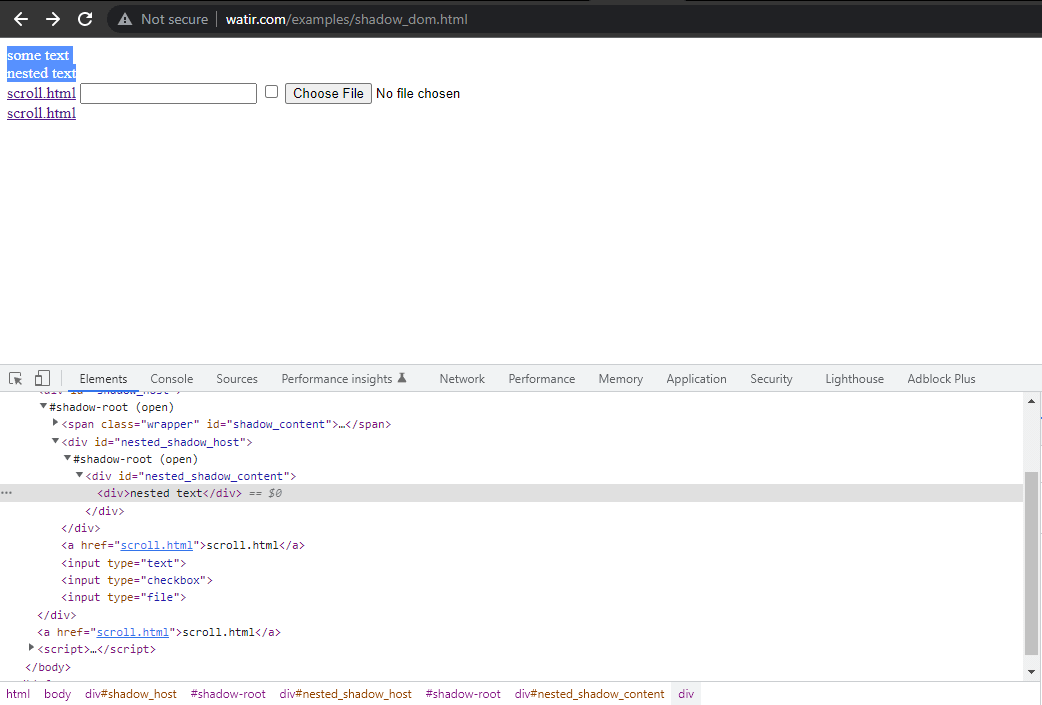
In this blog section on automating Shadow DOM in Selenium, let’s take an example of Watir.com’s Homepage and try to assert the shadow dom and the nested shadow dom text with Selenium WebDriver. Note it has one shadow root element before we reach text -> some text, and there are two shadow root elements before we reach the text -> nested text.
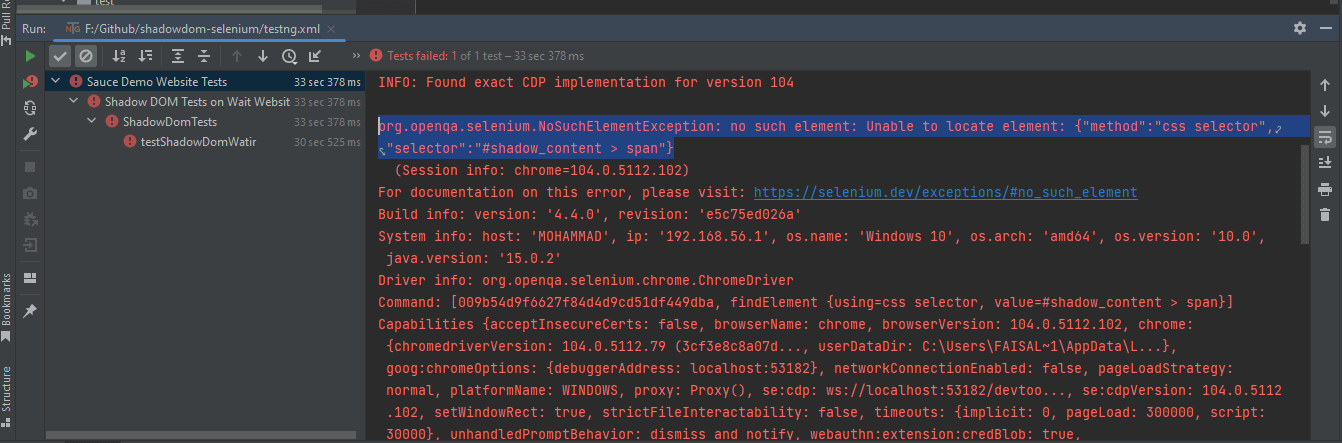
Now, if we try to locate the element using the cssSelector(“#shadow_content > span”), it
doesn’t get located, and Selenium WebDriver will throw NoSuchElementException.
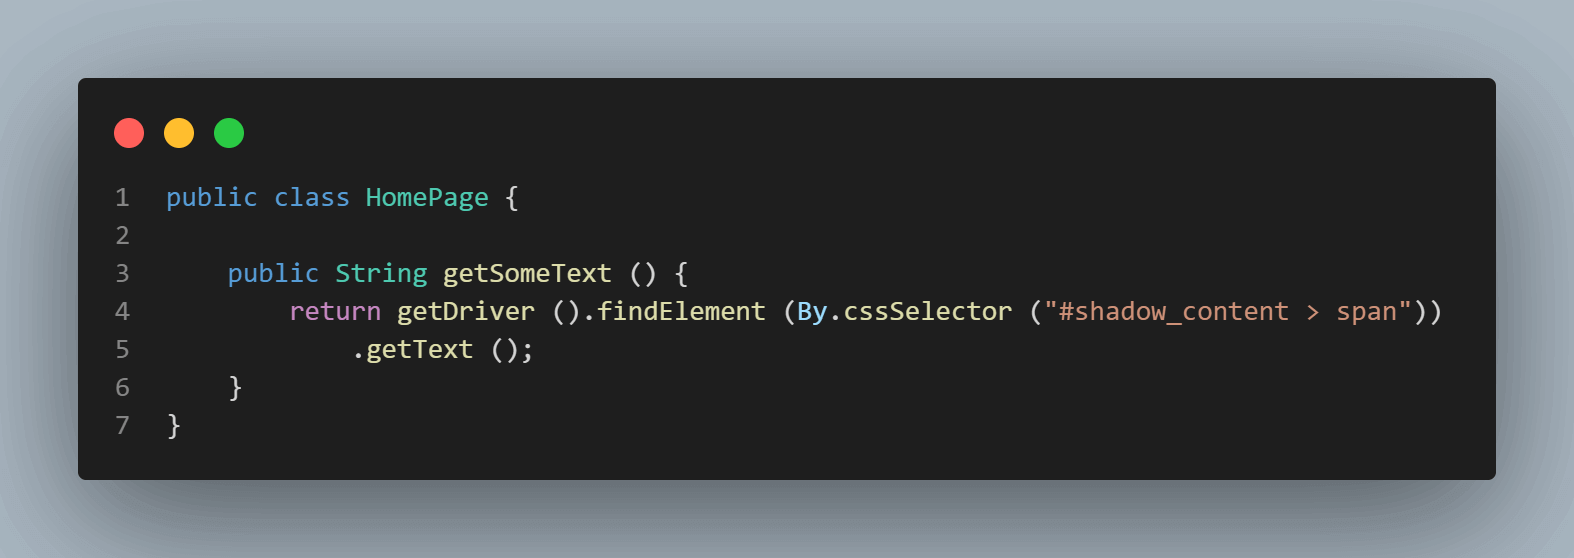
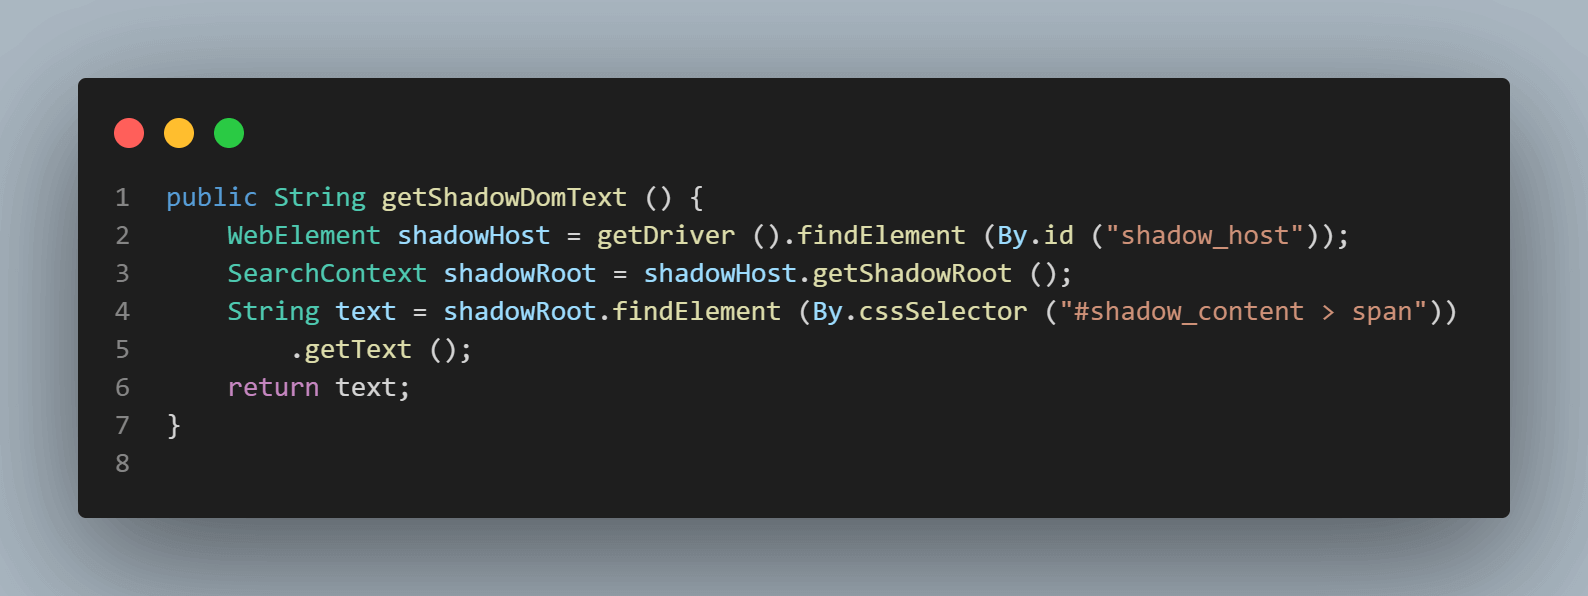
Here is the screenshot of the Homepage class, which has the code which tries to get text using
cssSelector(“#shadow_content > span”).
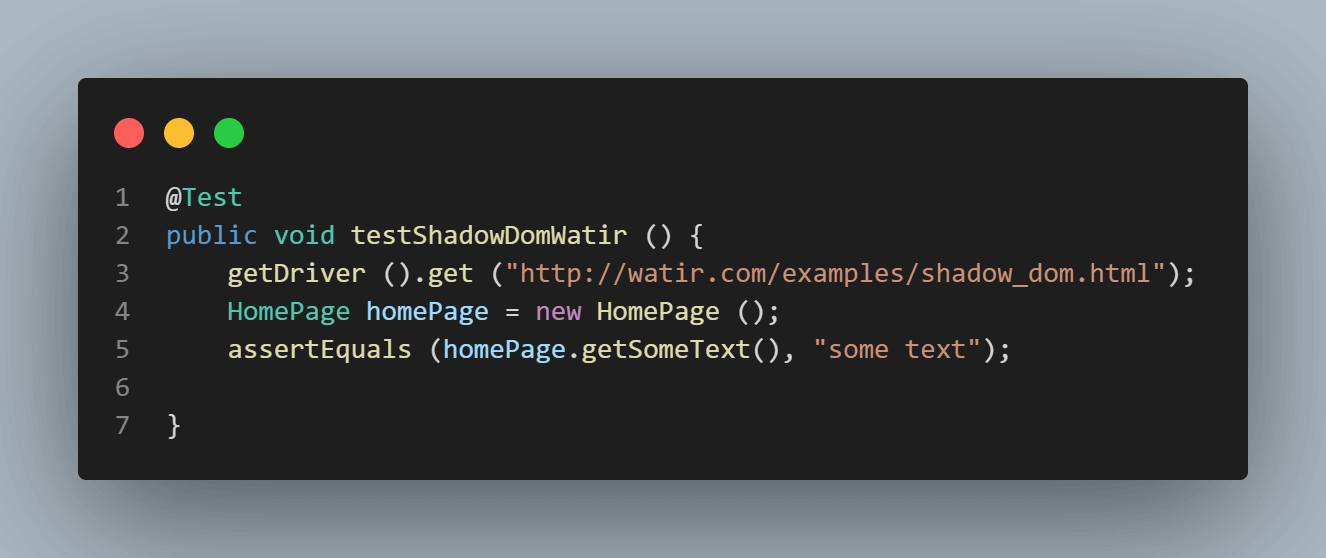
Here is the screenshot of the tests where we try to assert the text(“some text”).
Error on Running the tests shows NoSuchElementException
To locate the element correctly for the text, we need to go through the Shadow root elements. Only then would we be able to locate “some text” and “nested text” on the page?
How To Find Shadow DOM in Selenium WebDriver Using the ‘getShadowDom’ Method
With the release of Selenium WebDriver’s version 4.0.0 and above, the getShadowRoot() method was introduced and helped locate Shadow root elements.
Here are the syntax and details of the getShadowRoot() method:
	default SearchContext getShadowRoot()

	Returns:
	The ShadowRoot class represents the shadow root of a web component. With a shadow root, you can access the shadow DOM of a web component.

	Throws:
	NoSuchShadowRootException - If shadow root is not found.
As per the documentation, the getShadowRoot() method returns a representation of an element’s Shadow root for accessing the Shadow DOM of a web component.
In case Shadow root is not found, it will throw NoSuchShadowRootException.
Before we begin writing the tests and discussing the code, let me tell you about the tools we would use to write and run the tests:
The following programming language and tools have been used in writing and running the tests:
- Programming Language: Java 11
- Web Automation Tool: Selenium WebDriver
- Test Runner: TestNG
- Build Tool: Maven
- Cloud Platform: LambdaTest
Getting Started With Finding Shadow DOM in Selenium WebDriver
As discussed earlier, this project on Shadow DOM in Selenium has been created using Maven. TestNG is used as a test runner. To learn more about Maven, you can go through this blog on getting started with Maven for Selenium testing.
Once the project is created, we need to add the dependency for Selenium WebDriver, and TestNG in the pom.xml file.
Versions of the dependencies are set in a separate properties block. This is done for maintainability, so if we need to update the versions, we can do it easily without searching the dependency throughout the pom.xml file.
<?xml version="1.0" encoding="UTF-8"?>
<project xmlns="http://maven.apache.org/POM/4.0.0"
        xmlns:xsi="http://www.w3.org/2001/XMLSchema-instance"
        xsi:schemaLocation="http://maven.apache.org/POM/4.0.0 http://maven.apache.org/xsd/maven-4.0.0.xsd">
   <modelVersion>4.0.0</modelVersion>

   <groupId>io.github.mfaisalkhatri</groupId>
   <artifactId>shadowdom-selenium</artifactId>
   <version>1.0-SNAPSHOT</version>

   <properties>
       <project.build.sourceEncoding>UTF-8</project.build.sourceEncoding>
       <selenium.java.version>4.4.0</selenium.java.version>
       <testng.version>7.6.1</testng.version>
       <webdrivermanager.version>5.2.1</webdrivermanager.version>
       <maven.compiler.version>3.10.1</maven.compiler.version>
       <surefire-version>3.0.0-M7</surefire-version>
       <java.release.version>11</java.release.version>
       <maven.source.encoding>UTF-8</maven.source.encoding>
       <suite-xml>testng.xml</suite-xml>
       <argLine>-Dfile.encoding=UTF-8 -Xdebug -Xnoagent</argLine>
   </properties>

   <dependencies>
   <!-- https://mvnrepository.com/artifact/org.seleniumhq.selenium/selenium-java -->
   <dependency>
       <groupId>org.seleniumhq.selenium</groupId>
       <artifactId>selenium-java</artifactId>
       <version>${selenium.java.version}</version>
   </dependency>
   <!-- https://mvnrepository.com/artifact/org.testng/testng -->
   <dependency>
       <groupId>org.testng</groupId>
       <artifactId>testng</artifactId>
       <version>${testng.version}</version>
       <scope>test</scope>
   </dependency>
   <dependency>
       <groupId>io.github.bonigarcia</groupId>
       <artifactId>webdrivermanager</artifactId>
       <version>${webdrivermanager.version}</version>
       <exclusions>
           <exclusion>
               <groupId>com.google.guava</groupId>
               <artifactId>guava</artifactId>
           </exclusion>
       </exclusions>
   </dependency>
   </dependencies>

   <build>
   <plugins>
   <plugin>
       <groupId>org.apache.maven.plugins</groupId>
       <artifactId>maven-compiler-plugin</artifactId>
       <version>${maven.compiler.version}</version>
       <configuration>
           <release>${java.release.version}</release>
           <encoding>${maven.source.encoding}</encoding>
           <forceJavacCompilerUse>true</forceJavacCompilerUse>
       </configuration>
   </plugin>
   <plugin>
       <groupId>org.apache.maven.plugins</groupId>
       <artifactId>maven-surefire-plugin</artifactId>
       <version>${surefire-version}</version>
       <executions>
           <execution>
               <goals>
                   <goal>test</goal>
               </goals>
           </execution>
       </executions>
       <configuration>
           <useSystemClassLoader>false</useSystemClassLoader>
           <properties>
               <property>
                   <name>usedefaultlisteners</name>
                   <value>false</value>
               </property>
           </properties>
           <suiteXmlFiles>
               <suiteXmlFile>${suite-xml}</suiteXmlFile>
           </suiteXmlFiles>
           <argLine>${argLine}</argLine>
       </configuration>
   </plugin>
   </plugins>
   </build>
</project>
Let’s move on to the code now; the Page Object Model (POM) has been used in this project as it is useful in reducing code duplication and improving test case maintenance.

First, we would be finding the locator for “some text” and “nested text” on HomePage.
public class HomePage {
public SearchContext expandRootElement (WebElement element) {
SearchContext shadowRoot = (SearchContext) ((JavascriptExecutor) getDriver ()).executeScript (
"return arguments[0].shadowRoot", element);
return shadowRoot;
}
public String getSomeText () {
return getDriver ().findElement (By.cssSelector ("#shadow_content > span"))
.getText ();
}
public String getShadowDomText () {
WebElement shadowHost = getDriver ().findElement (By.id ("shadow_host"));
SearchContext shadowRoot = shadowHost.getShadowRoot ();
String text = shadowRoot.findElement (By.cssSelector ("#shadow_content > span"))
.getText ();
return text;
}
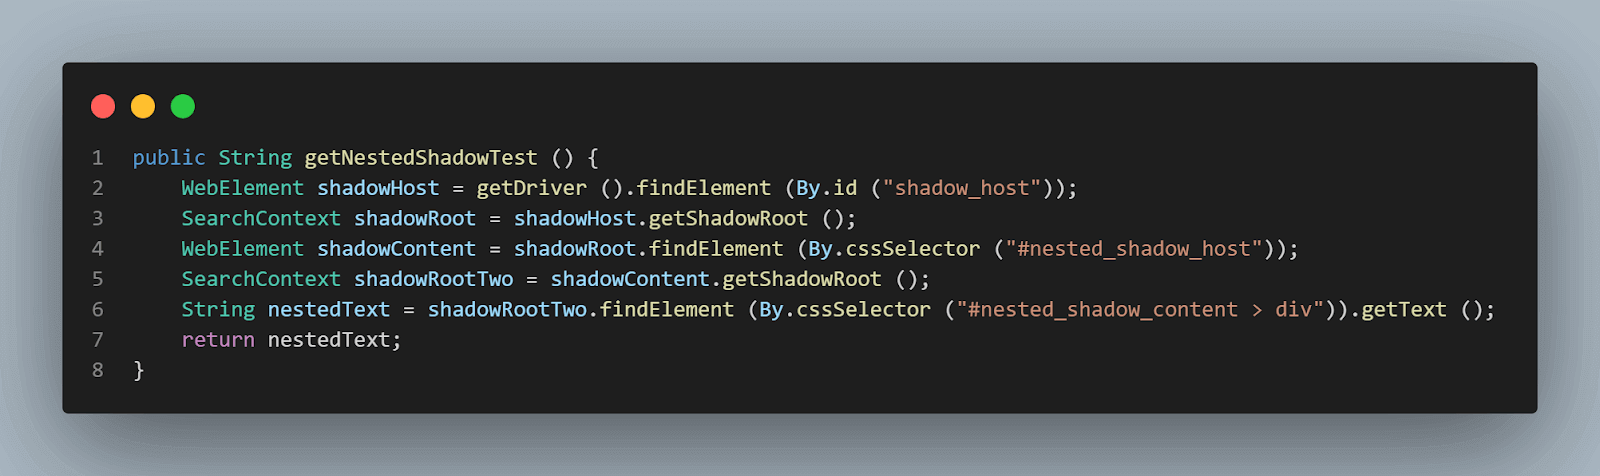
public String getNestedShadowText () {
WebElement shadowHost = getDriver ().findElement (By.id ("shadow_host"));
SearchContext shadowRoot = shadowHost.getShadowRoot ();
WebElement shadowContent = shadowRoot.findElement (By.cssSelector ("#nested_shadow_host"));
SearchContext shadowRootTwo = shadowContent.getShadowRoot ();
String nestedText = shadowRootTwo.findElement (By.cssSelector ("#nested_shadow_content > div")).getText ();
return nestedText;
}
public String getNestedText() {
WebElement nestedText = getDriver ().findElement (By.id ("shadow_host")).getShadowRoot ()
.findElement (By.cssSelector ("#nested_shadow_host")).getShadowRoot ()
.findElement (By.cssSelector ("#nested_shadow_content > div"));
return nestedText.getText ();
}
public String getNestedTextUsingJSExecutor () {
WebElement shadowHost = getDriver ().findElement (By.id ("shadow_host"));
SearchContext shadowRootOne = expandRootElement (shadowHost);
WebElement nestedShadowHost = shadowRootOne.findElement (By.cssSelector ("#nested_shadow_host"));
SearchContext shadowRootTwo = expandRootElement (nestedShadowHost);
return shadowRootTwo.findElement (By.cssSelector ("#nested_shadow_content > div"))
.getText ();
}
}Code Walkthrough
The first element that we would be located in the < div id = "shadow_host" > by using locator strategy – id.
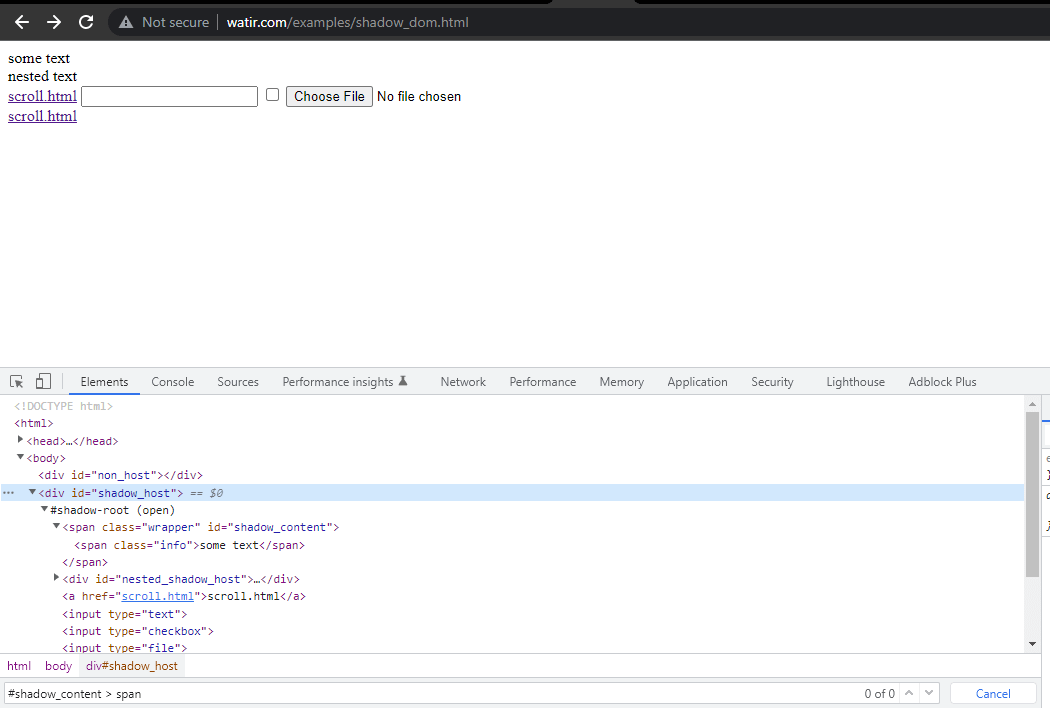
WebElement shadowHost = getDriver ().findElement (By.id ("shadow_host"));Next, we search for the first Shadow Root in the DOM next to it. For this, we have used the SearchContext interface. The Shadow Root is returned using the getShadowRoot() method. If you check the screenshot above, #shadow-root (open) it is next to the < div id = "shadow_host" >.
For locating the text – “some text,” there is only one Shadow DOM element we need to get through.
The following line of code helps us get the Shadow root element.
SearchContext shadowRoot = downloadsManager.getShadowRoot();Once Shadow Root is found, we can search for the element to locate the text – “some text.” The following line of code helps us get the text:
	String text = shadowRoot.findElement (By.cssSelector ("#shadow_content > span"))
	 .getText ();
Next, let’s find the locator of “nested text,” which has a nested Shadow root element, and let’s find out how to locate its element.
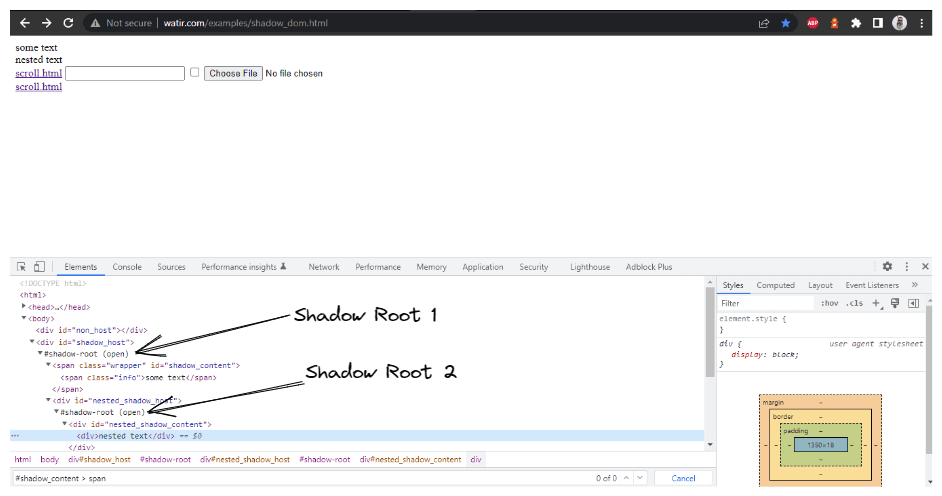

getNestedShadowText() method:
Starting from the top, as discussed in the above section, we need to locate< div id = "shadow_host" > by using locator strategy – id.
WebElement shadowHost = getDriver ().findElement (By.id ("shadow_host"));After that, we need to find the Shadow Root element by using the getShadowRoot() method; once we get the Shadow root element, we will need to get into finding the second Shadow root by using cssSelector for locating:
<div id ="nested_shadow_host">SearchContext shadowRoot = shadowHost.getShadowRoot ();
WebElement shadowContent = shadowRoot.findElement (By.cssSelector ("#nested_shadow_host"));Next, we need to find the second Shadow Root element by using the getShadowRoot() method. Finally, it is time to locate the actual element for getting the text – “nested text.”
The following line of code will help us in locating text:
SearchContext shadowRootTwo = shadowContent.getShadowRoot ();
	String nestedText = shadowRootTwo.findElement (By.cssSelector ("#nested_shadow_content > div"
Writing the Code in a Fluent Way
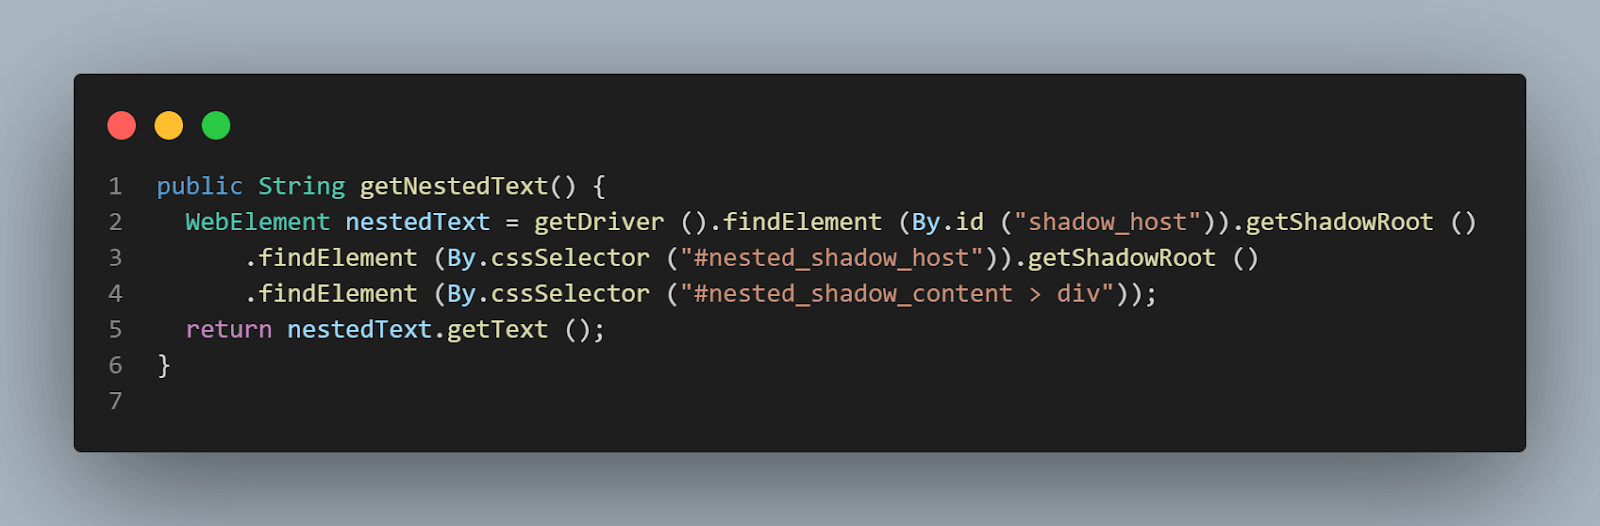
In the above section of this blog on Shadow DOM in Selenium, we saw a long way from where we have to locate the actual element we want to work with, and we have to do multiple initializations of WebElement and SearchContext interfaces and write multiple lines of code to locate a single element to work with.
We have a fluent way of writing this whole code as well, and here is how you can do that:
public String getNestedText() {
	 WebElement nestedText = getDriver ().findElement (By.id ("shadow_host"))
		 .getShadowRoot ()
		 .findElement (By.cssSelector ("#nested_shadow_host"))
		 .getShadowRoot ()
		 .findElement (By.cssSelector ("#nested_shadow_content > div"));
	 return nestedText.getText ();
	}
Fluent Interface’s design relies extensively on method chaining. A Fluent Interface pattern helps us write an easy-readable code that can be understood without putting effort into technically understanding the code. This term was coined first in 2005 by Eric Evans and Martin Fowler.
This is a method of chaining we would be performing to locate the element.
This code does the same thing as we did in the above steps.
- First, we would be locating the shadow_host element by using its id, after which we would get the Shadow Root element using the
getShadowRoot()method. - Next, We would search for the nested_shadow_host element using the CSS selector and get the Shadow Root element using the
getShadowRoot()method. - Finally, we would get the “nested text” text by using the cssSelector – nested_shadow_content > div.
How To Find Shadow DOM in Selenium Using JavaScriptExecutor
In the above code examples, we located elements using the getShadowRoot() method. Let’s now see how we can locate the Shadow root elements using JavaScriptExecutor in Selenium WebDriver.

getNestedTextUsingJSExecutor() method has been created inside the HomePage Class,
where we would be expanding the Shadow Root element based on the WebElement, we pass in the parameter. In the DOM(as shown in the screenshot above), we saw that there are two Shadow Root elements we need to expand before we get to the actual locator for getting the text – nested text. Hence, the expandRootElement() method is created instead of copy-pasting the same javascript executor code every time.
We would implement the SearchContext interface, which would help us with the JavaScriptExecutor and return the Shadow root element based on the WebElement we pass in the parameter.
	public SearchContext expandRootElement (WebElement element) {
	   SearchContext shadowRoot = (SearchContext) ((JavascriptExecutor) getDriver ()).executeScript (
		   "return arguments[0].shadowRoot", element);
	   return shadowRoot;
	}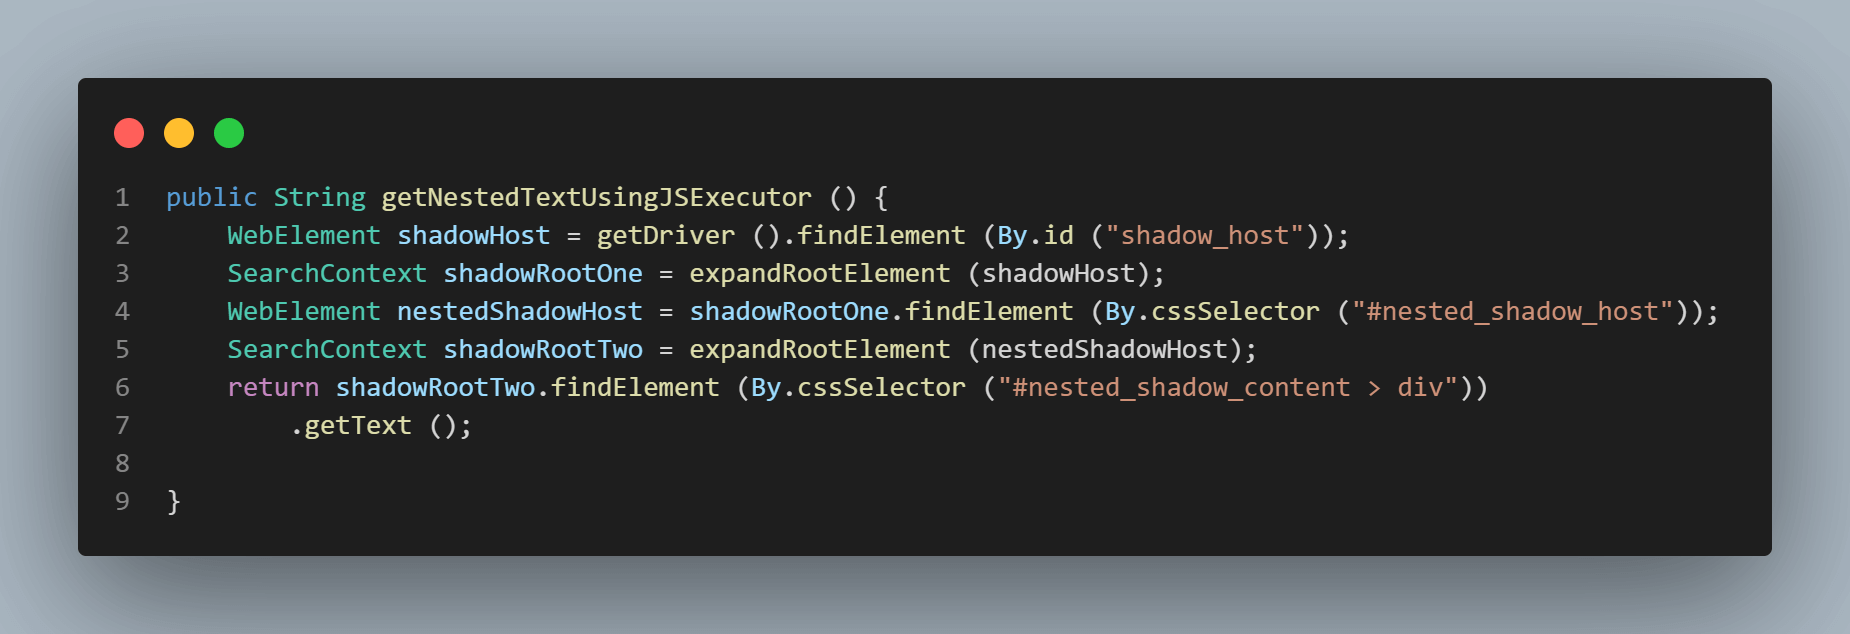
getNestedTextUsingJSExecutor() method
The first element that we would be located is the < div id = "shadow_host" > by using the locator strategy – id.
Next, we would be expanding the Root Element based on the shadow_host WebElement we searched for.
	WebElement shadowHost = getDriver ().findElement (By.id ("shadow_host"));
	SearchContext shadowRootOne = expandRootElement (shadowHost);
After expanding the Shadow Root one, we can search for another WebElement using cssSelector for locating:
<div id ="nested_shadow_host">WebElement nestedShadowHost = shadowRootOne.findElement (By.cssSelector ("#nested_shadow_host"));
SearchContext shadowRootTwo = expandRootElement (nestedShadowHost);Finally, it is time now to locate the actual element for getting the text – “nested text.”
The following line of code will help us in locating text:
shadowRootTwo.findElement (By.cssSelector ("#nested_shadow_content > div"))
				.getText ();
Demonstration
In this section of this article on Shadow DOM in Selenium, let’s quickly write a test and check that the locators we found in the previous steps are providing us with the required text. We can run assertions on the code we wrote to verify what we are expecting from the code is working.
@Test
	public void testShadowDomWatir () {
	   getDriver ().get ("http://watir.com/examples/shadow_dom.html");
	   HomePage homePage = new HomePage ();
	  // assertEquals (homePage.getSomeText(), "some text");
	   assertEquals (homePage.getShadowDomText (), "some text");
	   assertEquals (homePage.getNestedShadowText (),"nested text");
	   assertEquals (homePage.getNestedText (), "nested text");
	   assertEquals (homePage.getNestedTextUsingJSExecutor (), "nested text");
	}
This is just a simple test to assert the texts are displayed as correctly as expected. We would be checking that using the assertEquals() assertion in TestNG.
In actual value, we would provide the method we just wrote to get the text from the page, and in the expected value, we would pass the text “some text” or “nested text,” depending on the assertions we would be doing.
There are four assertEquals statements provided in the test.
- Checking the Shadow DOM element using the
getShadowRoot()method:

- Checking the nested Shadow DOM element using the
getShadowRoot()method:
- Checking the nested Shadow DOM element using the
getShadowRoot()method and writing fluently:
Execution
There are two ways to run the tests for automating Shadow DOM in Selenium:
- From the IDE using TestNG
- From the CLI using Maven
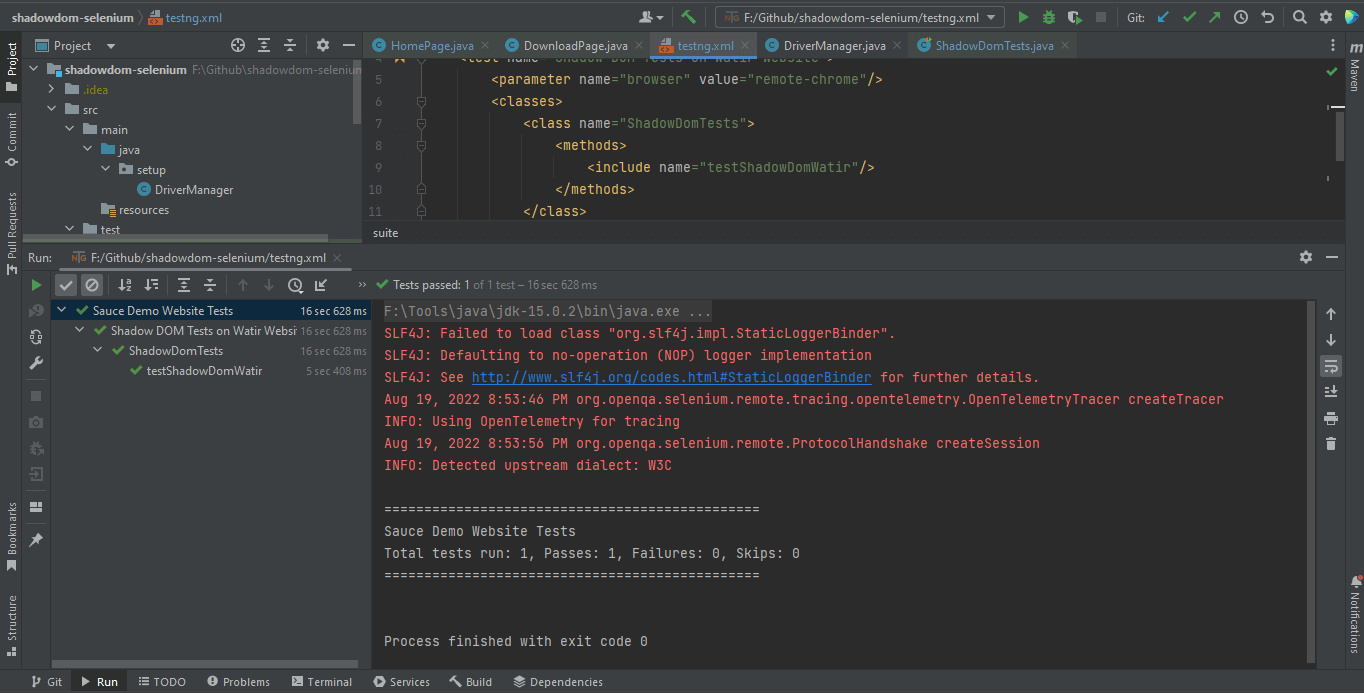
Automating Shadow DOM in Selenium WebDriver Using TestNG
TestNG is used as a test runner. Hence testng.xml has been created, using which we will run the tests by right-clicking on the file and selecting the option Run ‘…\testng.xml’. But before running the tests, we need to add the LambdaTest username and access Key in the Run Configurations since we are reading the username and access key from System Property.
LambdaTest offers cross-browser testing on an online browser farm of over 3000 real browsers and operating systems to help you run Java tests both locally and/or in the cloud. You can accelerate your Selenium testing with Java and reduce test execution time by multiple folds by running parallel tests on various browsers and OS configurations.
- Add Values in the Run Configuration as mentioned below:
- Dusername =
< LambdaTest username > - DaccessKey =
< LambdaTest access key >
- Dusername =
<?xml version="1.0" encoding="UTF-8"?>
<!DOCTYPE suite SYSTEM "http://testng.org/testng-1.0.dtd">
<suite name="Sauce Demo Website Tests">
   <test name="Shadow DOM Tests on Watir Website">
       <parameter name="browser" value="remote-chrome"/>
       <classes>
           <class name="ShadowDomTests">
               <methods>
                   <include name="testShadowDomWatir"/>
               </methods>
           </class>
       </classes>
   </test> <!-- Test -->
</suite>
Here is the screenshot of the test run locally for Shadow DOM in Selenium using Intellij IDE.
Automating Shadow DOM in Selenium WebDriver Using Maven
To run the tests using Maven, the following steps need to be run to automate Shadow DOM in Selenium:
- Open command Prompt/Terminal.
- Navigate to the root folder of the project.
- Type the command:
mvn clean install -Dusername=< LambdaTest username > -DaccessKey=< LambdaTest accessKey >.
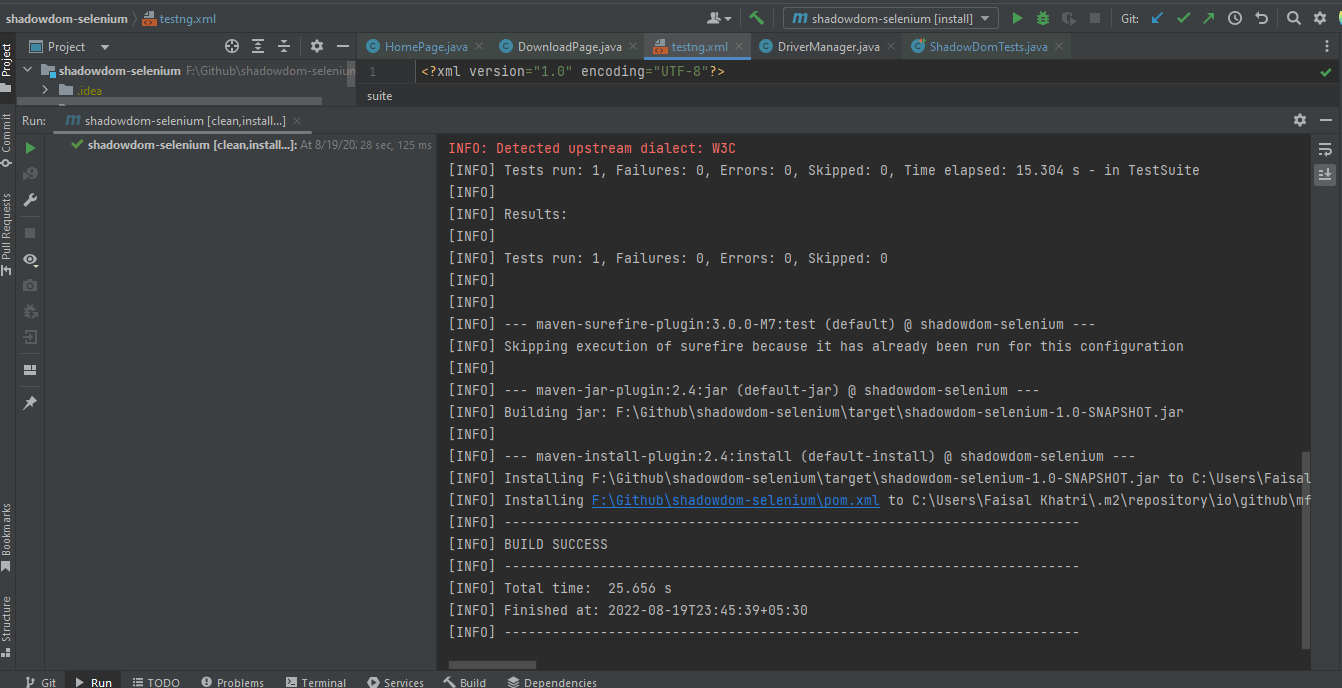
Following is the screenshot from IntelliJ, which shows the execution status of the tests using Maven:
Once the tests are run successfully, we can check out the LambdaTest Dashboard and view all the video recordings, screenshots, device logs, and step-by-step granular details of the test run. Check out the screenshots below, which will give you a fair idea of the dashboard for automated app tests.
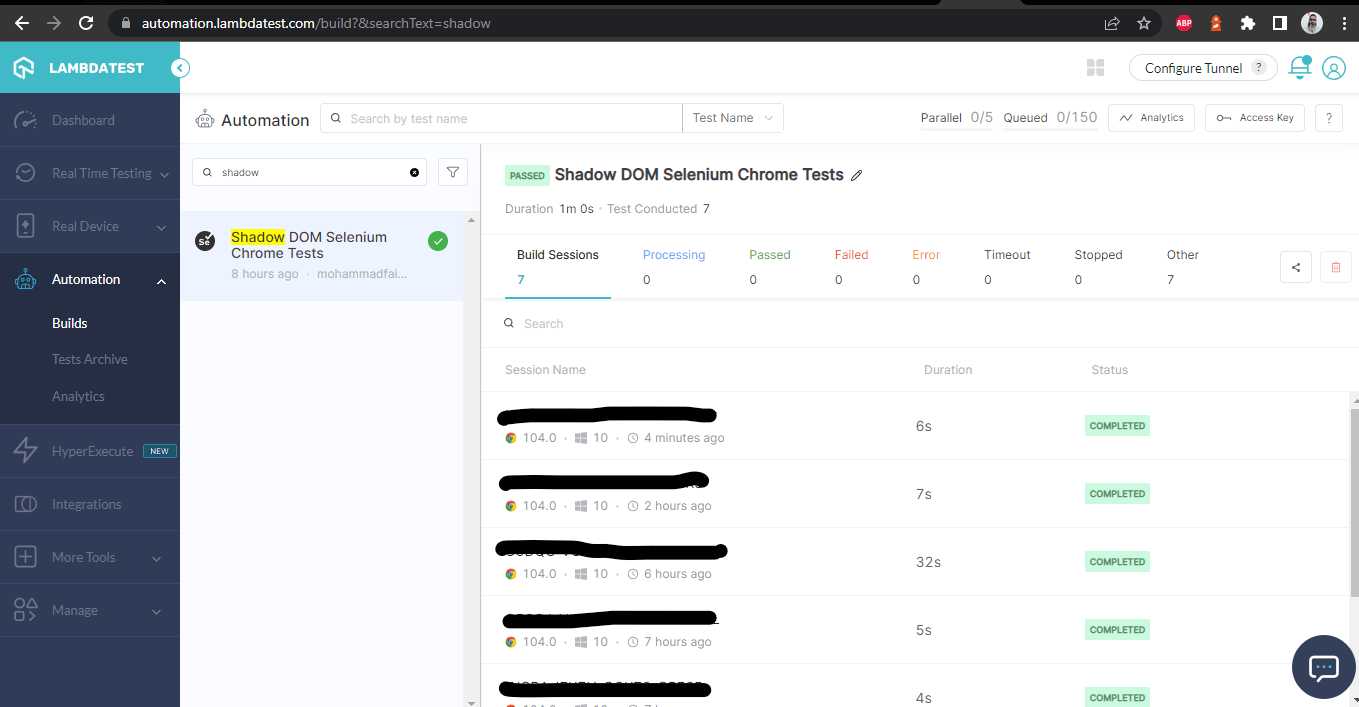 LambdaTest Dashboard
The following screenshots show the details of the build and the tests that were run for automating Shadow DOM in Selenium. Again, the test name, browser name, browser version, OS name, respective OS version, and screen resolution are all correctly visible for each test.
It also has the video of the test that was run, giving a better idea about how tests were run on the device.
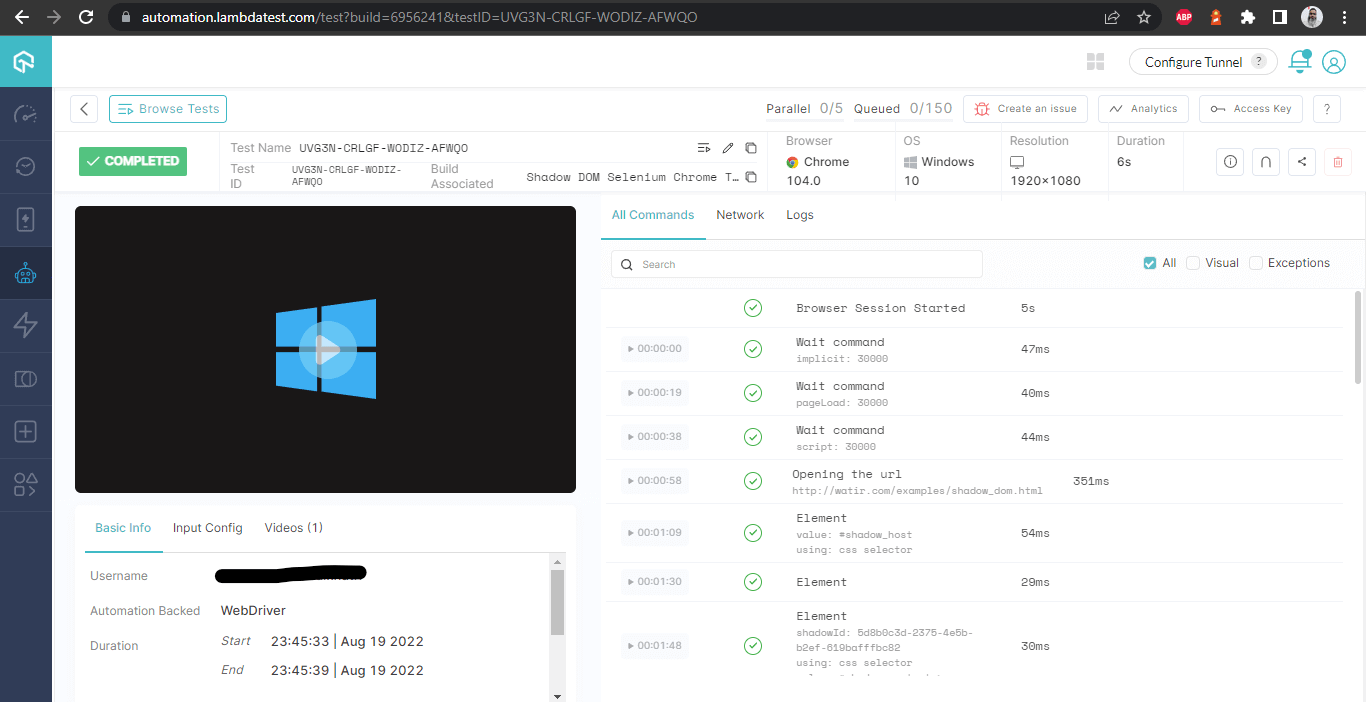 Build Details
This screen shows all the metrics in detail, which are very helpful from the tester’s point of view to check what test was run on which browser and accordingly view the logs for automating Shadow DOM in Selenium.
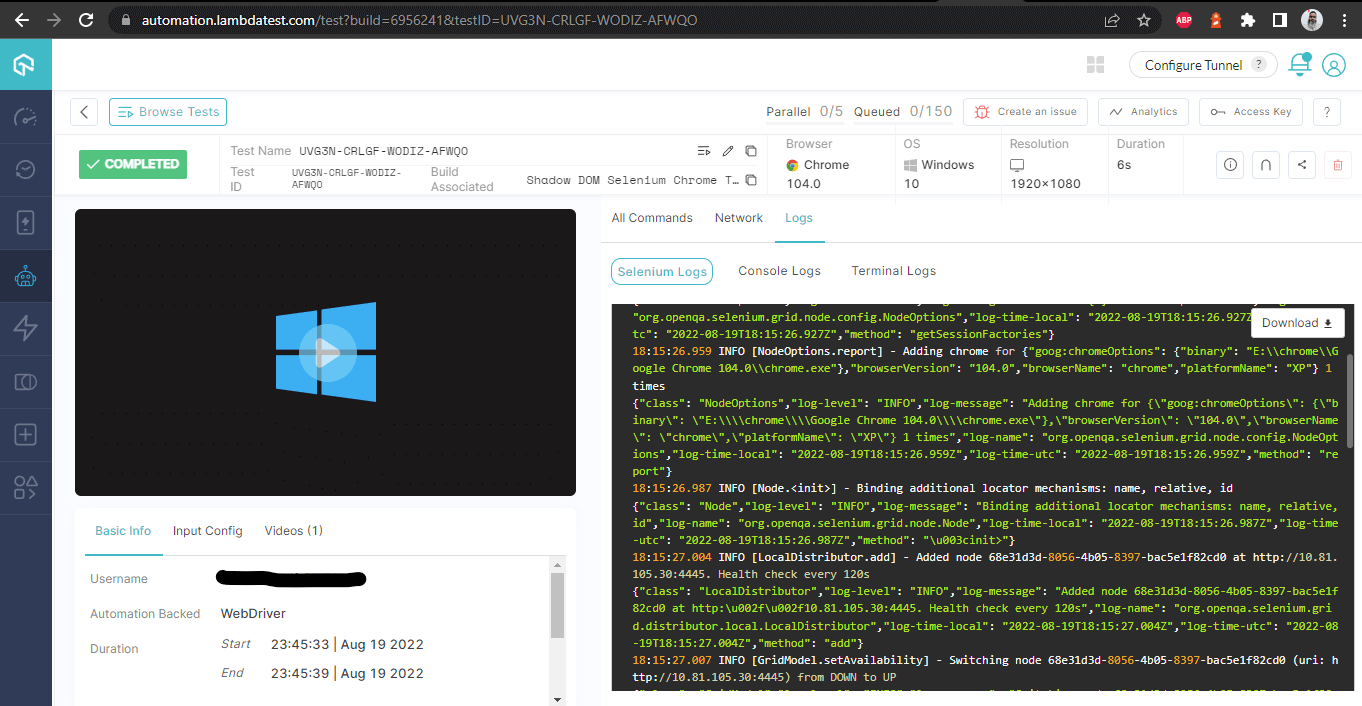 Build Details – with logs
You can access the latest test results, their status, and the overall number of tests passed or failed in the LambdaTest Analytics Dashboard. In addition, you may see snapshots of recently executed test runs in the Test Overview section.
Conclusion
In this blog on automating Shadow DOM in Selenium, we discussed how to find Shadow DOM elements and automate them using the getShadowRoot() method introduced in the Selenium WebDriver’s 4.0.0 and above version.
We also discussed locating and automating the Shadow DOM elements using JavaScriptExecutor in Selenium WebDriver and running the tests on LambdaTest’s Platform, which shows granular details of the tests that were run with Selenium WebDriver logs.
I hope this blog on Shadow DOM in Selenium gives you a fair idea about automating Shadow DOM elements using Selenium WebDriver.
Happy testing!
Published at DZone with permission of Faisal Khatri. See the original article here.
Opinions expressed by DZone contributors are their own.
Comments