IoT With MuleSoft: MuleSoft as a Platform for IoT Integrations
Learn more about IoT integrations with MuleSoft.
Join the DZone community and get the full member experience.
Join For FreeIn this blog, I will bring about the design details on how MuleSoft can be used as a platform for integrating IoT devices at a very elementary level. Using MuleSoft as an integration platform provides the following benefits:
- Seamless connectivity: Connect and orchestrate data on IoT devices or with back-end applications using APIs.
- Speed of delivery: Use open standards, developer-friendly tools, and prebuilt transport protocols, such as Zigbee and MQTT, to integrate IoT devices quickly.
- Future-proof your IoT integrations: Create a flexible IoT architecture and deploy anywhere — on-premises, in the cloud, or in a hybrid environment.
Introduction
For your design, let’s use Philips Hue Smart Light as our IoT device and Remote APIs. For example, check out this page to get a list of all lights that have been discovered by the bridge, provided by Philips Hue in order to communicate with the device.
Firstly, let me brief about the approach used:
- Set up the Hue Bridge for the Smart Light (Follow the User Manual and make sure to create a Hue Account in order to control the device via installed App).
- Get the Access Token for OAuth2 authentication, either Basic or Digest.
- Get the <whitelist_identifier> for identification.
- In Anypoint Studio or the Design Center, design a mule flow to have the required Remote APIs invoked.
- Deploy the application in the cloud using Runtime Manager.
Various APIs provided:
- GET/bridge/<whitelist_identifier>/lights: Gets a list of all lights that have been discovered by the bridge
- GET/bridge/<whitelist_identifier>/lights/new: Gets a list of lights that were discovered the last time a search for new lights was performed. The list of new lights is always deleted when a new search is started.
- POST/bridge/<whitelist_identifier>/lights: Starts searching for new lights.
- GET/bridge/<whitelist_identifier>/lights/<id>: Gets the attributes and state of a given light.
- PUT/bridge/<whitelist_identifier>/lights/<id>: Used to rename lights. A light can have its name changed when in any state, including when it is unreachable or off.
- PUT/bridge/<whitelist_identifier>/lights/<id>/state: Allows the user to turn the light on and off, modify the hue and effects.
- DELETE/bridge/<whitelist_identifier>/lights/<id>: Deletes a light from the bridge.
For more info on the above APIs, please refer to this page: https://developers.meethue.com/develop/hue-api/lights-api/.
Design Approach
The very first part of the approach is to generate an Access Token for OAuth2 Basic/Digest authentication and a Whitelist Identifier for device identification in order to invoke the above APIs.
Steps Involved:
- Register to Hue Developers account (https://developers.meethue.com/register/) and log in.
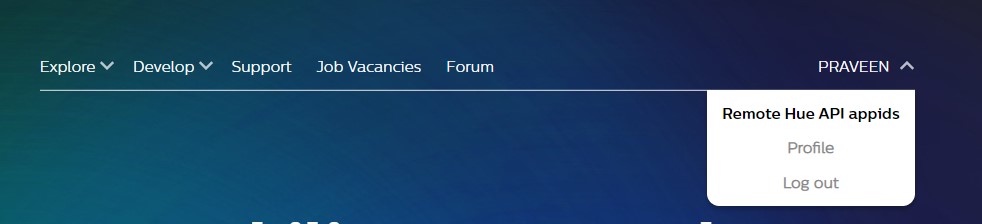
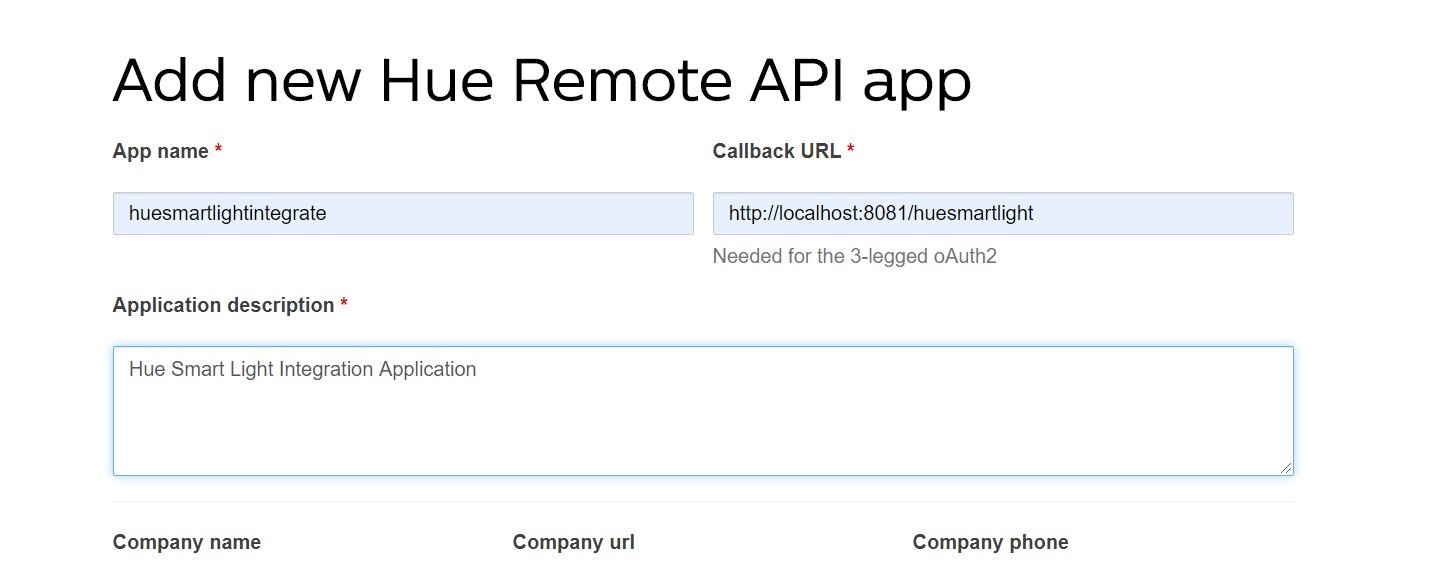
- Generate
clientidandclientsecretfor your Mule application to be developed by navigating to ‘Remote Hue API appids’ under your profile. Enter mandatory fields such as ‘App name,’ ‘Callback URL,’ and ‘Application description.’ Then select ‘I Agree’ and click 'Submit.’
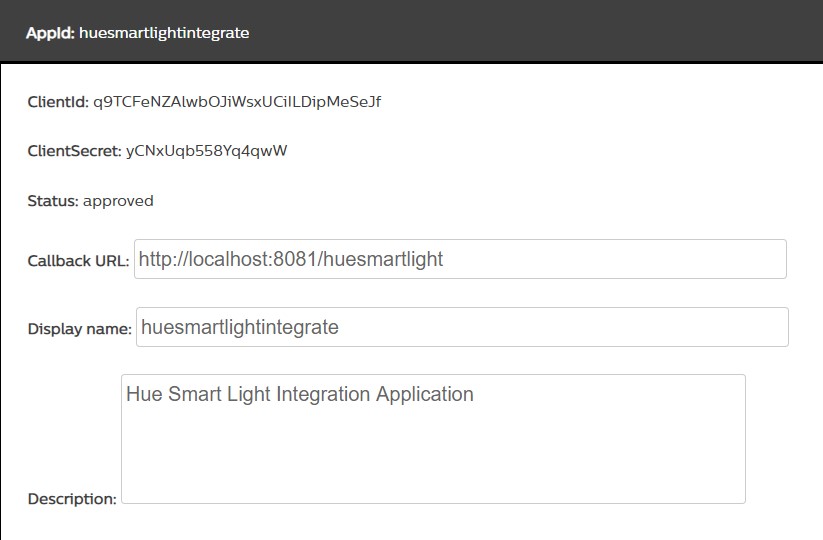
- Hit this URL: https://api.meethue.com/oauth2/auth along with the required query parameters in any browser. The complete GET HTTP request should be: https://api.meethue.com/oauth2/auth?clientid= q9TCFeNZAlwbOJiWsxUCiILDipMeSeJf&appid=ecb5fafffe00d034&deviceid=huesmartlightintegrate&state=xUvdhs&response_type=code where clientid is the one generated in the previous step. Appid is the ID generated once the Hue Account for the device is created. Deviceid is the one generated in the previous step. Lastly, state uses the same as given above, and response_type uses ‘code’ as value.
- On hitting this URL, you are taken to Grant permission page of Hue Account:
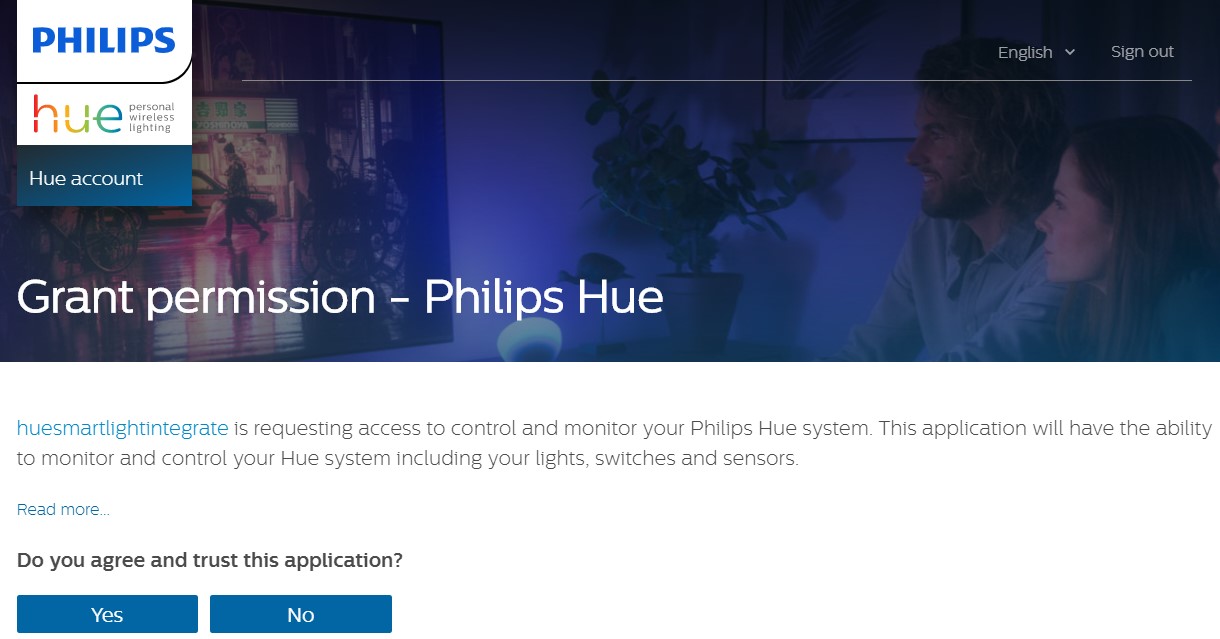
Click on ‘Yes’ in order to grant permission, which in turn takes you to the Callback URL you gave in Step #2. See http://localhost:8081/huesmartlight?code=2OOd5ZMY&state=xUvdhs where code is the authorization code.
There are two types of authorization headers possible for getting an access_token: Hue Remote API supports Digest and Basic authentication methods. We recommend using Digest for your applications, as with this method, you will be able to handle your credentials in a more secure way.
Digest Authentication
Submit this POST HTTP Request without an authorization header; this is called a Requesting Challenge.
Here the code is the code generated in the previous step. And the grant_type uses the 'authorization_code' as it's value.
This results in a response with the header ‘WWW-Authenticate’ as below:
Digest ", nonce="4583f111848efc8f350b2e237ed06835"
With this nonce, you now have all the information you need to build a Digest header to accompany your token request. The Digest header contains a response parameter that only your applications can build.
Now, submit this POST HTTP Request along with this Digest authorization HTTP header.
Digest header is as follows:
Authorization : Digest username="n77xrZFmxui3jCIMNpbih2yOIAGHDwdK",realm="oauth2_client@api.meethue.c om",nonce="4583f111848efc8f350b2e237ed06835",uri="/oauth2/token",response="753b344b680903d97dee6563d46237ee" where the username is the clientid, which you received from Hue when registering for the Hue Remote API (see previous steps).
The following are other important aspects of the Digest header:
realm: Same as given above.
nonce: The value you got from the challenge.
uri: Same as given above.
response: This is unique for every token request and must be calculated.
The response parameter is calculated from a set of MD5 hashed string concatenations. The response is calculated as follows:
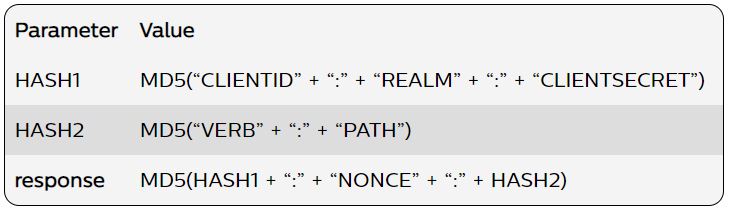
This occurs where we have:
CLIENTID: The clientid you have received from Hue when registering for the Hue Remote API.
REALM: The realm provided in the challenge “401 Unauthorized” response (i.e. “oauth2_client@api.meethue.com”).
CLIENTSECRET: The clientsecret you have received from Hue when registering for the Hue Remote API.
VERB: The HTTPS verb you are using to request the token (i.e. “POST”).
PATH: The path you are making your request to (i.e. “/oauth2/token”).
NONCE: The nonce provided in the challenge “401 Unauthorized” response.
In pseudo code, this would translate into the following:
var HASH1 = MD5(:q5MEfUxEO4GQgFSE") = eb94d24d533068011dbd883f8274b692;

var HASH2 = MD5("POST:/oauth2/token") = 8b5c4d23fb4deb8c96a72c04ee3de14a;

var response = MD5("eb94d24d533068011dbd883f8274b692:4583f111848efc8f350b2e237ed06835:8b5c4d23fb4deb8c96a72c04ee3de14a") = 753b344b680903d97dee6563d46237ee;
On submitting this POST request, a response is generated. See below for how the response looks:
< HTTPS/1.1 200 OK

< Content-Type: application/json

{

"access_token":"VAJc2G6SHQxLQN5qtAeohG7yUbTn",

"access_token_expires_in":"604799",

"refresh_token":"4k7uu0QTYBunlHlOgWLydNFnKl7z6gnD",

"refresh_token_expires_in":"9676799",

"token_type":"BearerToken"

}
Basic Authentication
Submit this POST HTTP Request along with a Basic authorization HTTP header that includes your base64-encoded clientid and clientsecret where we have:
code: The one generated in the previous step.
grant_type: Use ‘authorization_code’ as the value.
In order to obtain an access_token with basic authentication, this header is required:
Authorization: Basic <base64(clientid:clientsecret)>This is where we have the clientid & clientsecret we received from Hue when registering for the Hue Remote API (see previous steps).
On submitting, a response is generated, see below for how the response looks:
< HTTPS/1.1 200 OK

< Content-Type: application/json

{

"access_token":"jWH1al4ncKzu41u40dWckZFAAUxU",

"access_token_expires_in":"86399",

"refresh_token":"AaVBPYuxs6MxGTFasV7QdZ20Yq7unwVo",

"refresh_token_expires_in":"172799",

"token_type":"BearerToken"

}
The response will contain an access_token and a refresh_token. The access_token will only be valid for a short time, which means that the application has to refresh the access_token after expiration of the access_token and before the expiration time of the refresh_token. Otherwise, the user has to go through the authorization step again. The expire times of the access_token and the refresh_token are part of the response.
The rest of the steps are for generating the Whitelist Identifier, making use of the generated access_token.
Do a PUT on https://api.meethue.com/bridge/0/config with Body:
{ “linkbutton”: true }And add headers:
Authorization: Bearer <access_token>

Content-Type: application/json
This is where <access_token>is the access token generated in the previous step.
After this, make sure to press the link button of the Hue Bridge. Then, do a POST on https://api.meethue.com/bridge/ with the Body:
{ “devicetype” : ”<your-application-name>” }Where <your-application-name> is the same as the device id used in Step #3.
Headers are included below:
Authorization: Bearer <access_token>

Content-Type: application/json
The above request generates a response, see below for how the response looks:
[

{

"success":

{

"username" : "n5-MxnX7MtOC68RlkUFFhwLOdblu0lEuUL3w973i"

}

}

]
The above-generated username serves as the Whitelist Identifier for identification of the device.
For more information on the above steps, please refer to this Remote API Guide.
The last part of this approach is all about designing a Mule flow to invoke the required Remote APIs and deploying the application in the cloud using the Anypoint Platform Runtime Manager.
This is how your Mule flow looks:
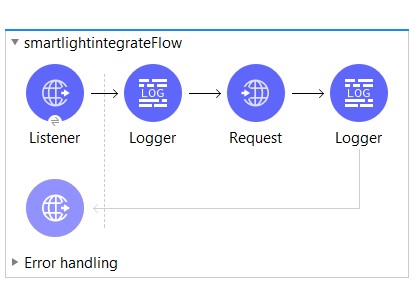 Steps involved:
1. Configure HTTP Listener component as below:
- Select Protocol as HTTP
- Select Host as ‘All Interfaces [0.0.0.0] (default)’
- Give Port as ‘8081’
- Give Base path as ‘/’
- Give Path as ‘/huesmartlight’
2. Configure the HTTP Request component to invoke any one of the Remote APIs as below:
- Select Protocol as HTTPS
- Give Host as ‘api.meethue.com’
- Give Base path as ‘/bridge’
- Select the Request Method as ‘PUT’
- Give Request Path as ‘/{username}/lights/{id}/state’
- Configure Header to have basic authentication as Authorization: ‘Bearer <access_token>’ where <access_token> is the Bearer token generated in the first part.
- Configure URI parameters as the username : ‘<whitelist_identifier>’ ; id : ‘1’ where <whitelist_identifier> is the username generated in the last step of the first part.
3. Deploy your Mule application in the Cloud using Runtime Manager.
4. Test the API in Postman by doing a POST on http://localhost:8081/huesmartlight.
Opinions expressed by DZone contributors are their own.
Comments