Secure Spring Boot 3 Application With Keycloak
Are you an experienced Java developer but new to Keycloak? Read through this tutorial presenting step-by-step examples of how to secure your REST API.
Join the DZone community and get the full member experience.
Join For FreeI have already described how to secure a Spring Boot 2-based REST API with Keycloak here. Today, I would like to create a separate text with the same topic but for Spring Boot 3 — a newer, shiner version of Spring Boot.
Most of the Keycloak configuration and settings is one to one with the article for Spring Boot 2. I do not want to duplicate too much content so if anything is unclear I recommend going there.
Before we start — a quick disclaimer:
Here you can find only the most interesting code samples. The full source code is available in my GitHub repository.
Local Keycloak Instance
Before we start doing any integration and configurations, we need to run our local Keycloak instance. I recommend using the Keycloak Docker image but you can use the standalone version as well.
In the case of a Docker image, the following command should do the job.
docker run -p 8090:8080 -e KEYCLOAK_ADMIN=admin -e KEYCLOAK_ADMIN_PASSWORD=admin quay.io/keycloak/keycloak:22.0.0 start-devIt will run the Keycloak image if you have one locally, or pull it and then run it if you do not. Additionally, it will forward the Docker image port 8080 to 8090 on your local device (this will be important later on). It will also set Keycloak Admin Console credentials to admin/admin.
Configuration
Keycloak configuration is the same as for the article for Spring Boot 2. However, I would like to describe it once again.
Keycloak
1. Log in to Admin Console on localhost:8090.
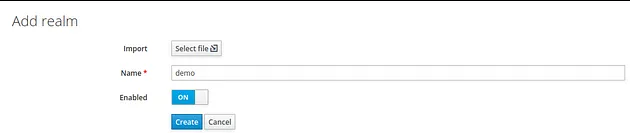
2. Create a new realm named demo:
3. Create a new client named demo-app with public access type. Set its Valid Redirect URIs to * (I do not recommend this for any production services), and save your changes.


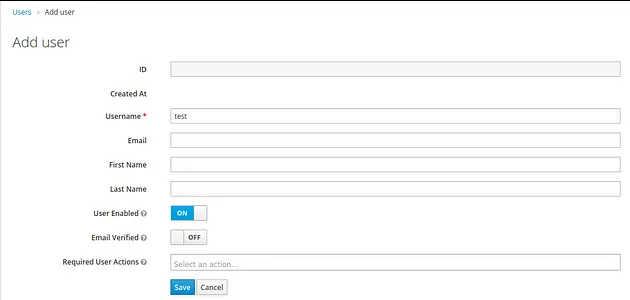
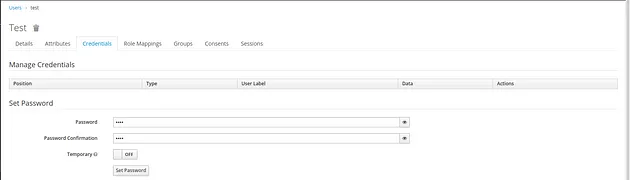
4. Create a new user with credentials test/test.

Spring Boot 3
As I mentioned in the article about Spring Boot 2, Keycloak deprecated a lot of different adapters — the Spring Boot adapter is one of them. That is why this integration will be quite different than the previous one.
1. Add Required Dependencies
As the Keycloak Spring Boot adapter is deprecated, for now, we have to use another approach — I choose to go through with spring-boot-starter-oauth2-resource-server. It is a Spring Security-based library for interacting with OAuth2 complain authorization servers — servers that take care of issuing access tokens to the client.
Additionally, we will need a dependency for standard spring-boot-starter-security.
<dependency>
    <groupId>org.springframework.boot</groupId>
    <artifactId>spring-boot-starter-oauth2-resource-server</artifactId>
</dependency>
<dependency>
    <groupId>org.springframework.boot</groupId>
    <artifactId>spring-boot-starter-security</artifactId>
</dependency>
2. Configure Spring Boot Properties Required by Keycloak
spring.security.oauth2.resourceserver.jwt.issuer-uri= http://localhost:8090/realms/demo: The URL to our Keycloak realmspring.security.oauth2.resourceserver.jwt.jwk-set-uri= ${spring.security.oauth2.resourceserver.jwt.issuer-uri}/protocol/openid-connect/certs: JSON Web Key URI to use to verify the JWT token
3. Creating the Token Converter: KeycloakJwtTokenConverter
First, we will add two more properties to our configuration.
token.converter.principal-attribute=preferred_username
This parameter is not required by Keycloak or Spring Boot but will make examples much more readable. With such a configuration, we can easily extract the Keycloak user name from a token available on the Spring Boot side. By default — without this configuration, after calling .getName() on the Authentication object we will get the Keycloak user id which is standard UUID.
token.converter.resource-id=demo-app: The name of the client that our Spring Boot application will use
Now we will define the class for reading the above properties.
@Configuration
@ConfigurationProperties(prefix = "token.converter")
public class TokenConverterProperties {

    private String resourceId;
    private String principalAttribute;

    public String getResourceId() {
        return resourceId;
    }

    public Optional<String> getPrincipalAttribute() {
        return Optional.ofNullable(principalAttribute);
    }

    public void setResourceId(String resourceId) {
        this.resourceId = resourceId;
    }

    public void setPrincipalAttribute(String principalAttribute) {
        this.principalAttribute = principalAttribute;
    }
}
Now we should be able to inject the required properties in a nice manner inside our Converter.
Declaration of the class KeycloakJwtTokenConverter:
public class KeycloakJwtTokenConverter implements Converter<Jwt, JwtAuthenticationToken>
Now we have to implement the convert method.
@Override
public JwtAuthenticationToken convert(@NonNull Jwt jwt) {
    Stream<SimpleGrantedAuthority> accesses = Optional.of(jwt)
            .map(token -> token.getClaimAsMap(RESOURCE_ACCESS))
            .map(claimMap -> (Map<String, Object>) claimMap.get(properties.getResourceId()))
            .map(resourceData -> (Collection<String>) resourceData.get(ROLES))
            .stream()
            .map(role -> new SimpleGrantedAuthority(ROLE_PREFIX + role))
            .distinct();

    Set<GrantedAuthority> authorities = Stream
            .concat(jwtGrantedAuthoritiesConverter.convert(jwt).stream(), accesses)
            .collect(Collectors.toSet());

    String principalClaimName = properties.getPrincipalAttribute()
            .map(jwt::getClaimAsString)
            .orElse(jwt.getClaimAsString(JwtClaimNames.SUB));

    return new JwtAuthenticationToken(jwt, authorities, principalClaimName);
}
Inside the method, we are extracting all the accesses and authorities described inside the token — to get information about the user. Additionally, we are getting the principal claim name to get a readable username later on.
4. Create a Class With Security Configuration
@Configuration
@EnableWebSecurity
public class GlobalSecurityConfiguration {

    private final KeycloakJwtTokenConverter keycloakJwtTokenConverter;

    public GlobalSecurityConfiguration(TokenConverterProperties properties) {
        JwtGrantedAuthoritiesConverter jwtGrantedAuthoritiesConverter
                = new JwtGrantedAuthoritiesConverter();
        this.keycloakJwtTokenConverter
                = new KeycloakJwtTokenConverter(
                        jwtGrantedAuthoritiesConverter,
                        properties);
    }

    @Bean
    public SecurityFilterChain securityFilterChain(HttpSecurity http) throws Exception {
        http
                .authorizeHttpRequests()
                .anyRequest()
                .authenticated();
        http
                .oauth2ResourceServer()
                .jwt()
                .jwtAuthenticationConverter(keycloakJwtTokenConverter);
        http
                .sessionManagement()
                .sessionCreationPolicy(SessionCreationPolicy.STATELESS);
        return http.build();
    }
}
With such a configuration, Spring Security requires all the incoming requests to our REST API to be authenticated. If the request is not authenticated, it will fail with the 401 HTTP status code.
Furthermore, we are using our KeycloakJwtTokenConverter to get all the interesting data from the general JWT Token. At this point, there are no roles and accesses; in the production-grade application probably some more config will be needed.
That is all the configuration you will need to secure your REST API with Keycloak and Spring Boot 3; the hello endpoint remains the same. Now let’s test it.
Test
For testing our integration I will use IntelliJ build-in HTTP client. In my opinion, Keycloak requests can be somewhat complex, and creating such a request in curl can take some time.
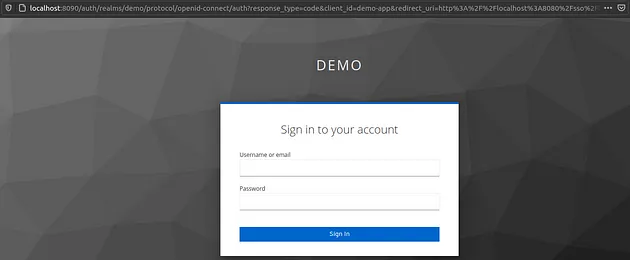
If everything is done correctly, sending a request http://localhost:8080/hello/ from the browser should result in redirection to the Keycloak login page.
With the IntelliJ HTTP client, the result should look more or less like this.

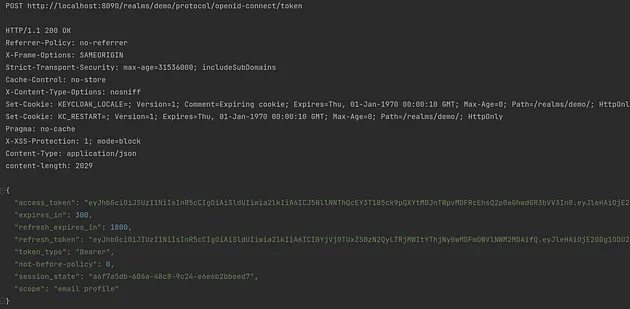
Now we can see that our API is protected by Keycloak and accessing an endpoint will require authentication within the Keycloak. The next thing we have to do is to obtain the access token from Keycloak. Fortunately, Keycloak exposes the REST API that can be used to request and refresh access tokens. The following request should be sufficient to get our access token.

Here is a list of request parameters used with a short description:
client_id: The name of the client which you want to use to authenticate your userusername: Your user’s namepassword: Your user’s passwordgrant_type: A name of a Grant Type we are using to exchange a user’s credentials for an access token
Here we use the password as Grant Type (OAuth-specific mechanism), so we use the username and password to authenticate ourselves within Keycloak and get the correct token. If you want to read more about OAuth Grant Types, I encourage you to read this text.
The response should look more or less like this.
Now we need to go back to the previous request. Thanks to some magic of the HTTP client we do not need to perform any changes — the client will get the value of the access_token field from the response. Then the client will use the value as the bearer token for the next request in the hello endpoint.
Here is the request:

The response from our backend should be similar to the one on the screen.

Et voilà — your API is secured with Keycloak and you have learned something new (at least I hope so).
Summary
As you can see, integrating Spring Boot 3 and Keycloak does not have to be hard. Thanks to all the Spring Boot auto-configuration, it can be done relatively easily. I hope my article deepened your Keycloak or Spring Boot knowledge.
If you'd like to read more about security and Keycloak I encourage you to check out these additional articles:
- What Keycloak Is and What It Does
- OpenID Connect Flows
- SAML vs OAuth vs OpenID Connect — Which One Suits You the Most?
Thank you for your time.
Opinions expressed by DZone contributors are their own.
Comments