An ARM Cortex-M3-Based Bare-Metal OS
Explore an intro to bare-metal software development for smart devices based on the ARM Cortex-M series of micro-controllers using open-source tools.
Join the DZone community and get the full member experience.
Join For FreeARM-based systems are ubiquitous in today's world. Most of our smartphones, tablets, smart speakers, smart thermostats, and even data centers are likely powered by an ARM-based processor. The difference between the traditional laptop using Intel or ARM-based x86 chips and ARM is that ARM processors have a smaller form factor, less power consumption, and come in a variety of flavors. Amongst the multitude of ARM processor offerings, we will pick the ARM Cortex-M series processor.
We shall build a bare-metal operating system from scratch. We will use the arm-none-eabi toolchain and QEMU for rapid prototyping. The host system is Ubuntu 18.04 and both the toolchain and QEMU can be installed using the Ubuntu software repository.
QEMU can be invoked with the below command line. It emulates the Stellaris board, which has 256K flash memory and 64K of SRAM.
qemu-system-arm -M lm3s6965evb --kernel main.bin --serial stdio
When you compile a typical C program, whether for ARM or Intel/AMD processors, the structure will look like the code below. The entry point for the program is at main. You may use a library function printf to print out a statement on a terminal console.
int main (int argc, char* argv[])
{
	printf("Hello World\");

  	return 0;
}

// gcc -o main main.c
Underneath the hood, the compiler and linker add a C runtime library to your code which adds startup code, printf, etc., which makes your program run. In contrasting fashion, a vanilla bare-metal firmware has to implement its own startup code, create the linker file, and define an entry point for its code to run.
The code block below defines a linker script. It defines the flash memory and RAM memory starting address and length. The linker takes the object code as input and performs relocation/copies different sections of the code at the appropriate address as defined in the linker file.
ENTRY(Reset_Handler)

MEMORY
{
flash (rx) : ORIGIN = 0x00000000, LENGTH = 256K
ram  (rwx) : ORIGIN = 0x20000000, LENGTH =  64K
}
.....

SECTIONS

{
.text :
{
     . = ALIGN(4);
     *(.isrvectors)
     *(.text)
     *(.rodata)
     *(.rodata*)
     . = ALIGN(4);
     _endflash = .;
} > flash

.data :
{
     . = ALIGN(4);
     _start_data = .;
     *(vtable)
     *(.data)
     . = ALIGN(4);
     _end_data = .;
} >  ram AT > flash
.....
}
The interrupt vectors, text, and read-only section are loaded into the flash memory and our code runs directly from the flash. The mutable data is loaded into the RAM.
.align 2
.thumb
.syntax unified
.section .isrvectors
 .word  vTopRam                 /* Top of Stack                 */
 .word  Reset_Handler+1               /* Reset Handler                */
 .word  NMI_Handler+1                 /* NMI Handler                  */
 .word  HardFault_Handler+1           /* Hard Fault Handler           */
 .word  MemManage_Handler+1           /* MPU Fault Handler            */
 .word  BusFault_Handler+1            /* Bus Fault Handler            */
 .word  UsageFault_Handler+1          /* Usage Fault Handler          */
 .word  0                           /* Reserved                     */
 .word  0                           /* Reserved                     */
 .word  0                           /* Reserved                     */
 .word  0                           /* Reserved                     */
 .word  SVC_Handler+1                 /* SVCall Handler               */
 .word  DebugMon_Handler+1            /* Debug Monitor Handler        */
 .word  0                           /* Reserved                     */
 .word  PendSV_Handler+1              /* PendSV Handler               */
 .word  SysTick_Handler+1             /* SysTick Handler              */
From the Interrupt Service Routine Vectors, Reset_Handler, SVC_Handler and SysTick_Handler are of importance to us in this tutorial.
The following register map is from the TI Stellaris LM3S6965 datasheet. It defines the registers which we shall use in our tiny OS.
#define STCTRL (*((volatile unsigned int *)0xE000E010)) // SysTick Control Register
#define STRELOAD (*((volatile unsigned int *)0xE000E014)) // SysTick Load Timer Value
#define STCURRENT (*((volatile unsigned int *) 0xE000E018)) // Read Current Timer Value
#define INTCTRL (*((volatile unsigned int *)0XE000ED04)) // Interrupt Control Register
#define SYSPRI2 (*((volatile unsigned int *)0XE000ED1C)) // System Interrupt Priority
#define SYSPRI3 (*((volatile unsigned int *)0xE000ED20)) // System Interrupt Priority
#define SYSHNDCTRL (*((volatile unsigned int *)0xE000ED24))
#define SVC_PEND() ((SYSHNDCTRL & 0x8000)?1:0) // SuperVisory Call Pending
#define TICK_PEND() ((SYSHNDCTRL & 0x800)?1:0) // SysTick Pending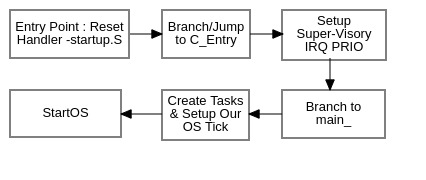
Figure 1: Setup Flow
Our Reset_Handler function is part of the startup code. Cortex-M architecture defines a handler mode and a thread mode. All exceptions are run in the handler mode and user code runs in the thread mode. On power-on reset, we are in thread mode.
For our OS to function we require the following:
- Startup code: Reset handler and ISR Vectors
- Setting up exceptions for supervisor/software interrupt and the OS timer
- Define common system calls such as Read/Write/Sleep and our
custom create_task. - Define a Task Control Block (TCB) struct and a circular linked list of TCB called Run Queue.
ARM architecture defines a 24-bit SysTick timer and it is present in all Cortex-M3 SOCs. To make our OS generic and portable, we use the SysTick timer to generate periodic interrupts (~ 10 ms) for our OS Timer, which is also when our scheduler kicks in to manage tasks.
The priority for SVC is kept higher than SysTick in our OS.
Reset_Handler is defined below with a jump to c_entry().
.thumb_func
Reset_Handler:
  # add assembly initializations here
  LDR r0, =c_entry
  BX r0

#define TICK_PRIO(prio) {SYSPRI3 &=0x1FFFFFFF; \
			 SYSPRI3 |=(prio<<28); \
			}

#define SVC_PRIO(prio) {SYSPRI2 &=0x1FFFFFFF;   \
			SYSPRI2 |=(prio<<28);	\
			}
The code snippet below shows sample tasks and their addition to our Run Queue of our OS. We define three tasks that are perhaps similar to the void loop() in Arduino where code runs forever. In our simple tasks, we print the task ID and then go to sleep for a variable amount of time.
The write() and sleep() APIs are system calls.
typedef void (*CallBack)();
typedef struct _task_struct {
				CallBack func;
				unsigned int priority;
}TASK_STRUCT;
....

  // Sample Tasks
void task1() {
  while (1) {
    write("T1 ", 2);
    // yield cpu
    sleep(1000);
  }
}
...
// Define three tasks with different priorities. Lower number means higher priority.
  TASK_STRUCT task[3];

  task[0].priority = 8;
  task[0].func = &task1;

  task[1].priority = 5;
  task[1].func = &task2;

  task[2].priority = 10;
  task[2].func = &task3;

  create_task((void*)&task, 3);
...
The ARM Procedure Call Standard separates the group of ARM Registers which will be preserved or clobbered when a function call happens. Register R0-R3 holds the arguments to a function and R0 also holds the return value of the function. You will notice this in all exception-handling routines.
The assembly code snippet below triggers an SVC interrupt and it jumps to the SVC Handler.
#define TASK_CREATE 31
....
create_task: @r0-r3 hold the arguments and are saved automatically.
	stmfd sp!,{lr} // Push Return Address onto fully descending stack
	push {r4-r11} // save r4-r11
	SVC #TASK_CREATE // Call Supervisor Call to jump into Handler Mode
	pop {r4-r11} // Pop Back the saved register
	ldmfd sp!,{lr} // Pop LR
	mov pc,lr // return from the exception handler
...
The code snippet below defines the SVC Handler. From the SVC instruction, we extract the immediate number, which in this case is #31, and use it in our C SVC Handler function which shall init our RunQueue linked list defined as RUNQ.
// SVC Interrupt Handler
SVC_Handler:
...
CPSID i // disable system interrupts
..
// Extract SVC Immediate value
ldr r1,[sp,#28]
ldrb r1,[r1,#-2]
BL C_SVC_Hndlr // Branch to C SVC Handler
CPSIE i // enable system interrupts
BX LR // Jump to Return Address
...


 int C_SVC_Hndlr(void *ptr, int svc_num) {
  int ret = 0, len = 0;
  void *stck_loc = ptr;

  switch (svc_num) {
    case 2: { // Write System Call
      char *data = (char*)*(unsigned int *)(stck_loc);  // R0 on stack
      len = *(unsigned int *)(stck_loc + 1);  // R1 on stack
      put(data, len); // Write to Serial Termimal
      break;
    }
    case 4: // Sleep System Call
      ms_delay(*(unsigned*)ptr); // *ptr holds the delay value
      break;

    case 31: // Create Task System Call
      task_create((void *)stck_loc);
      break;
  }
}
After defining our RUNQ linked list, we arm the SysTick Timer, point our program counter to the starting address of the first function in our list, and exit out of the handler mode.
// Simple Scheduler

void Scheduler(void) {

  uint8_t max_prio = 64;
  TCB *pt = RUNQ;
  TCB *next = RUNQ;
  // find a task which is not sleeping and not blocked
  do{
    pt = pt->next;
    if((pt->priority < max_prio)&&((pt->is_blocked)==0)&&((pt->sleep)==0)){
      max_prio = pt->priority;
      next = pt;
    }
  } while(RUNQ != pt);
  RUNQ = next;
}
When the SysTick timer expires, our scheduler function is invoked which picks the next task in our queue which is not sleeping or is not blocked and has a higher priority. Now with our OS implemented, it is time to compile/build our firmware and run it on QEMU.
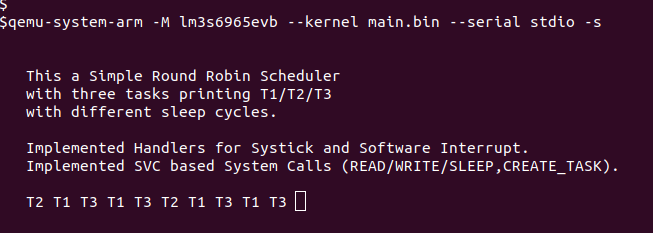
Figure 2: QEMU Output
With our QEMU output, we see the task ID getting printed. Task T2 has the highest priority and gets picked by our scheduler. It prints its task id and goes to sleep while yielding the CPU. The scheduler then picks the next task T1 with a medium priority until it yields, and then finally T3 runs. Since T2 sleeps for double the amount of time than T1 and T3, we see T1 and T3 run again before T2 gets scheduled back, and we follow the starting pattern T2, T1, T3.
Conclusion
We have introduced a simple bare-metal OS that implements system calls and a simple round-robin scheduler to loop through all the tasks in the system. Our OS lacks locking primitives like semaphores and mutexes. They can be implemented by adding another linked list of waiting tasks. The mutex locks or unlock operations can be handled with a system call which when triggered disables the interrupts (scheduler), which allows for serialization of the code. If the lock is already held by another task, the calling task is added to the wait queue and is de-queued when the mutex unlock operation occurs.
Overall, this tutorial provides insights into how firmware-based OS/RTOS internals work. It also serves as a template for the readers for their own OS implementation and expansion on the ideas of operating systems, process management, virtual memory, device drivers, etc.
Opinions expressed by DZone contributors are their own.
Comments